Module 1 - React Router
Intro to React Router
Welcome to the world of React Router V6! You're about to embark on a journey that will empower you to build powerful and dynamic single-page applications (SPAs) with ease.
React Router is a popular library that helps you manage navigation and routing in your React applications. With the release of version 6, React Router introduces exciting changes and improvements, making it even more intuitive and efficient to handle routing in your projects.
In this Core Competency, we'll dive into the fundamentals of React Router V6, exploring its key concepts, features, and benefits. By the end, you'll have a solid foundation to navigate through your applications, enabling seamless transitions between different views and enhancing the overall user experience. Let's get started on this exciting journey!
Understanding Routing
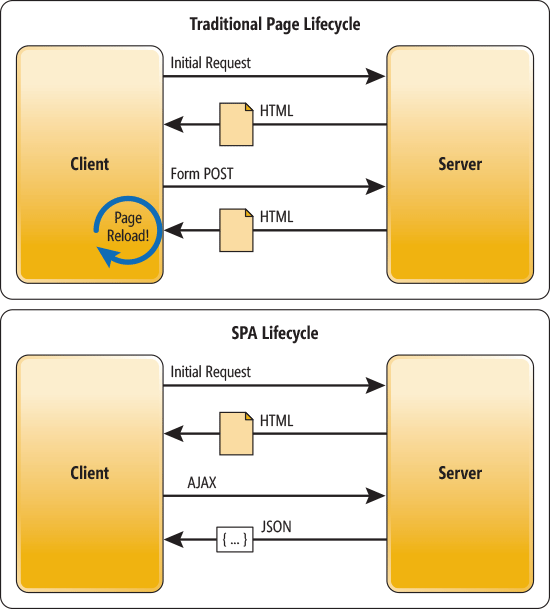
Traditional web applications start by loading a page that contains some kind of navigation for the user to move around. Whenever the user clicks on a link, on a button, or submits a form with information, the server on the other side will receive a new HTTP request and send back the corresponding resource. This "routing" is known as server-side routing and is characterized by the server sending back a new set of HTML, CSS, and JS files for every new page that the user's browser needs to render.
A SPA (Single-page application), in comparison, is a web app implementation that loads only a single HTML web document and then updates the body content of that single document via JavaScript, when different content is to be shown. The app will load the initial HTML/CSS/JS bundle on start-up and from that point, no more page refreshes will be necessary. When a new page needs to be rendered, the app may request JSON data from the server which instructs the app how to update the page. An SPA has the potential to improve responsiveness (by avoiding multiple requests to the server) and can substantially facilitate the development of the application.
Client-Side Routing with React Router
Client-side routing is only possible when the application is prepared to properly handle links, URLs and pages. Instead of sending a GET request for a new page when the user clicks on a link, the app will just render a new component! At the same time, the app will update the address bar to simulate that a new URL is being fetched from the server, to allow the user to go back and forth using the browser's history (including the back and forward arrows in the navigation bar).
That's exactly what React Router does for you!
In the end, the user doesn't really know (or care) how the page is updating. It just works.
How to Build It
To get started we will need a fresh React application. Open your terminal and set up a new Create React App (CRA) folder structure like so:
npx create-react-app@5.0.1 my_projectNext, cd into the project folder and run:
npm i react-router-dom@6.8.1Now open your project in VSCode. Navigate to App.js and erase all contents. Then, type the following import code:
import { BrowserRouter, Routes, Route, Link } from "react-router-dom";Setting up routes and links
React Router is a client-side routing solution for React apps. It allows you, the developer, to have full control of which URLs will render which component(s) in your Single Page Application.
For example, if the current URL in the browser is acme.com/, you might want React to render the Home component. If the URL changes to acme.com/bikes, perhaps due to a user clicking on a Shop for Bikes! link, you want React to render the Bikes component on the screen.
Let's buckle up and start writing React Router code!
How to Build It
Assuming that you have already installed react-router-dom via npm, the next step involves "wrapping" the
component tree with <BrowserRouter>. This step is necessary for React Router to work its
magic and must only be done once for a given application. Commonly, you will wrap the whole tree inside the
index.js module, but to keep all the code in this demo in a single file, you will work inside App.js
Setting up React Router
import { BrowserRouter, Routes, Route, Link } from "react-router-dom";

export default function App() {
  return (
    <BrowserRouter>
      <h1>My App</h1>
      {/* In here we will set up navigation and routes */}
    </BrowserRouter>
  );
}
Building Components for the Different Routes
Usually, you will create one big, top-level component for each of the main "screens" of your app, each screen corresponding to a specific URL. Let's suppose your app has three main screens or routes: "Home," "Cats" and "About." To keep all the code in the same module for this demo, you will declare these components inside App.js, above the App function:
const style = { margin: "1rem", padding: "0.5rem", border: "2px solid black" };

function Home(props) {
  return <h2 style={{ ...style, borderColor: "red" }}>The Home Screen</h2>;
}

function Cats(props) {
  return <h2 style={{ ...style, borderColor: "blue" }}>The Cats Screen</h2>;
}

function About(props) {
  return <h2 style={{ ...style, borderColor: "green" }}>The About Screen</h2>;
}
Adding Links to Navigate the URL
This next step involves creating navigation links to change the URL when the user clicks on them. Of course, this will be "client-side", or "frontend" routing: no page reloads will trigger as the user navigates between the three screens. Modify the App component like so:
export default function App() {
  return (
    <BrowserRouter>
      <h1>My App</h1>
      <nav>
        <Link to="/">Home Screen</Link>
        <Link to="cats">Cats Screen</Link>
        <Link to="about">About Screen</Link>
      </nav>
    </BrowserRouter>
  );
}
Let's see what our Website looks like. Navigate back to your terminal and run: npm start
Click on the rendered anchor tags, and watch the address bar in the browser change to the correct path without the browser reloading. Also, the Back and Forward buttons of the browser should work correctly. This is "client-side routing" in action: the URL changes its path, but no network request is made to the server!
At this point, the components are not rendering yet; you are just managing URLs and links.
Creating the Routes
Finally, you will set up the components' routes. You will create routes for each of the three URLs (/, cats and about). Avoid adding forward slashes where they are not needed! Edit the App component:
export default function App() {
  return (
    <BrowserRouter>
      <h1>My App</h1>
      <nav>
        <Link to="/">Home Screen</Link>
        <Link to="cats">Cats Screen</Link>
        <Link to="about">About Screen</Link>
      </nav>
      <Routes>
        <Route path="/" element={<Home />} />
        <Route path="cats" element={<Cats />} />
        <Route path="about" element={<About />} />
      </Routes>
    </BrowserRouter>
  );
}
Notice how the to prop of each <Link> matches the path prop of
each <Route>. The component associated with each route is defined through the
element prop.
And just like that, every time a user causes the URL to change by clicking on a link (or typing in the
address bar), the <Routes> component will look for a route with a path prop
that matches the new URL. If a match is found, the component specified in the element prop of
the <Route> will render to the screen.
Navigating programmatically
The react-router-dom module exposes an interesting hook that you can use to navigate to any route programmatically.
Say you want to redirect the user to a login page when an "inactivity" timer expires or take the user to a specific page when a particular state changes (via useEffect). All of this is possible with the useNavigate hook.
How to Build It
In this example, you will simply attach a "click" navigation handler to a button.
First, you must import the hook (add useNavigate to your original import statement). Then, you can edit the App.js file to add:
- A new More component (page) which will be rendered (navigated to) when the user clicks on the button inside the About page;
- A new route the the More page;
- And the function that uses the hook, inside the About component.
import {
  BrowserRouter,
  Routes,
  Route,
  Link,
  useNavigate,
} from "react-router-dom";

const style = { margin: "1rem", padding: "0.5rem", border: "2px solid black" };

function Home(props) {
  return <h2 style={{ ...style, borderColor: "red" }}>The Home Screen</h2>;
}

function Cats(props) {
  return <h2 style={{ ...style, borderColor: "blue" }}>The Cats Screen</h2>;
}

function About(props) {
  const navigate = useNavigate();
  return (
    <>
      <h2 style={{ ...style, borderColor: "green" }}>
        The About Screen
        <button onClick={() => navigate("/more")}>More Details</button>
      </h2>
    </>
  );
}

function More(props) {
  return (
    <h2 style={{ ...style, borderColor: "orange" }}>
      THESE ARE ALL THE DETAILS!
    </h2>
  );
}

export default function App() {
  return (
    <BrowserRouter>
      <h1>My App</h1>
      <nav>
        <Link to="/">Home Screen</Link>
        <Link to="cats">Cats Screen</Link>
        <Link to="about">About Screen</Link>
      </nav>
      <Routes>
        <Route path="/" element={<Home />} />
        <Route path="cats" element={<Cats />} />
        <Route path="about" element={<About />} />
        <Route path="more" element={<More />} />
      </Routes>
    </BrowserRouter>
  );
}
The navigate function either takes an absolute URL path, or a delta representing where you want to go in the history stack:
navigate(-1) would take the user the previous page. So you could easily add a "Back" button to
the More page by editing the More component:
function More(props) {
  const navigate = useNavigate();
  return (
    <h2 style={{ ...style, borderColor: "orange" }}>
      THESE ARE ALL THE DETAILS!
      <button onClick={() => navigate(-1)}>Back</button>
    </h2>
  );
}
Conclusion
Client-side routing is a key feature of React applications and allows developers to design responsive navigation. Your app doesn't need to implement routing and could work just fine by implementing buttons and forms for the user.
But in many cases, it is desirable to be able to handle URLs typed in the address bar, as well as allow users to bookmark certain "pages", and use the browser's history to navigate back and forth.
Next, you will learn how to take your routing skills to the next level, by using dynamic and nested routes!
Advanced React Router
Welcome to Advanced React Router! In this Core Competency, you'll take your routing capabilities to the next level with two powerful features: URL parameters and nested routes. React Router provides convenient ways to access URL parameters, enabling dynamic and personalized content based on the current URL. Additionally, nested routes offer a powerful way to organize your app's components and handle complex routing scenarios.
Whether you're building a simple blog or a sophisticated e-commerce platform, understanding how to utilize URL parameters and nested routes will empower you to create highly flexible and interactive React applications. Let's jump in!
Using URL parameters
You've already learned how to set up some routes in a React application. Thanks to React Router, you can make specific components render for specific URLs. However, the routes can become unmanageable when your application has too many URLs. For example, you could have URLs like the following:
acme.com/users/1 // gets user with id 1
acme.com/users/2 // gets user with id 2
.
.
.
acme.com/users/225 //gets user with id 225 (this could go on forever)
Each defined route above will render the user of the given ID, but you must define each route. How do you manage that in your code? Do you set up a route to trigger when the URL matches users/1, and another route for users/2, and another, and another?
There's got to be a better way, right? Right!
A better way to manage numerous routes with parameters is to set up a single route that is parametric. Parametric routes allow path patterns to match a single route. If we wanted to do a user route and pass the id later, during runtime, we could define the route as:
<Route path="users/:id" element={<User />} />The :id will be replaced by any value that comes after users/ in the URL. Any URL that matches the pattern will render the User component, and the code inside the component can access the dynamic parameter to update the JSX output with information on the relevant user. Let's find out how!
How to Build It
To get started, you can use the previously created React app to edit the files or spin up a new "Create React App" like so:
npx create-react-app@5.0.1 my_project
cd my_project
npm start
Now replace the contents of the App.js file with the following:
import { BrowserRouter, Routes, Route, Link } from "react-router-dom";

const style = { margin: "1rem", padding: "1rem", border: "2px solid black" };

function Home(props) {
  return <div style={{ ...style, borderColor: "red" }}>The Home Screen</div>;
}
function User(props) {
  return (
    <div style={{ ...style, borderColor: "blue" }}>Details about a user</div>
  );
}
export default function App() {
  return (
    <BrowserRouter>
      <nav>
        <Link to="/">Home Page</Link>
      </nav>
      <Routes>
        <Route path="/" element={<Home />} /> // here's the Home route, the only route so far
      </Routes>
    </BrowserRouter>
  );
}
The code above is the starting point and includes a single route for the Home page at path /.
Start by adding a few links inside your <nav> (we'll get to the routes in a moment) so you can toggle between different users. You will map over an array of integers to dynamically create links to particular users:
<nav>
  <Link to="/">Home Page</Link>
  {[1, 2, 3].map((int) => (
    <Link key={int} to={`users/${int}`}>
      User {int}{" "}
    </Link>
  ))}
</nav>
Quickly test your links to ensure they work. The UI should be blank as you toggle between the three users, but you should see the browser's address bar adjusting correctly. The / path should render the Home component.
Pro Tip: We have added a key attribute (or prop) to every link to avoid error messages in the console. React expects every item rendered through the map iteration to have a unique key.
With the links in place, you can add the parametric route. To make a route match users/anything, you add a parametric segment in the path of the new route using a colon:
<Routes>
  <Route path="/" element={<Home />} />

  {/* notice the ":id" in the route below. The colon means "variable segment",     and it can be any data type */}
  <Route path="users/:id" element={<User />} />
</Routes>
Navigate to a user again and see how the User component renders now. The User component will obligingly render if you manually edit the URL in the browser's address bar by typing "users/" followed by any value and hitting Enter.
Pro Tip: as you probably noticed, you don't necessarily need a link to navigate to a "page". You can manually type the address or programmatically use the useNavigate hook introduced previously.
At this point, the content displayed in the UI is the same for all user URLs because the User component receives no dynamic data. You can fix that by getting the parameter in the URL and utilizing a hook to fetch the user's information. React Router includes the useParams hook that you can use to "grab" the value of the variable segment in the URL.
To get the URL parameter, you'll first import the hook:
import {
  BrowserRouter,
  Routes,
  Route,
  Link,
  useParams,
} from "react-router-dom";
You'll use this hook inside the User component:
function User(props) {
  // the name of the param is `id` because we used `users/:id` in the path of the route
  const { id } = useParams();
  return (
    <div style={{ ...style, borderColor: "blue" }}>Details about user {id}</div>
  );
}
Now that you have access to the ID of the particular user inside the component, you can add code to use it. Let's add a couple of imports to manage effect and state:
import { useEffect, useState } from "react";Use some code to fetch details about a specific user. First, go to your project folder and install axios:
npm i axiosYou are going to use the https://webapis.bloomtechdev.com/users/ endpoint, which exposes five users (1...5) and returns a JSON like this:
"{
  "id": 1,
  "name": "Ada Lovelace",
  "bio": "Ada Lovelace was an English mathematician and writer, chiefly known for her work on Charles Babbage's early mechanical general-purpose computer, the Analytical Engine. Many regard her as the first computer programmer."
}"
Finally, edit the User component to fetch the data and pass it to setUser:
function User(props) {
  // The param is `id` because we did `:id` in the path of the Route in App!
  const { id } = useParams(); // grabbing `1` from `users/1` and using it in the JSX
  const [user, setUser] = useState({});
  useEffect(() => {
    // append the id to the end of this url
    axios.get(`https://webapis.bloomtechdev.com/users/${id}`).then((obj) => {
      setUser(obj.data);
    });
  }, [id]);
  return (
    <div style={{ ...style, borderColor: "blue" }}>
      <h2>
        User {user.id}: {user.name}
      </h2>
      <h3>{user.bio}</h3>
    </div>
  );
}
Notice how the effect hook is only triggered when the id changes. The effect updates the user state variable and forces the component to render, returning the JSX, which now contains the fetched user's data.
Using nested routes
You have learned how to work with React Router to create/render "pages" for static URLs and "pages" for URLs with variable segments. Now let's look at another one of React Router's features: nested routes. Nested routes allow you to render part of a page without reloading the rest.
Why would you want to do that? Let's say you want to render an initial "Products" page with a title and product links. When the user clicks a product link, the URL updates to include the product ID. This usually causes the whole page to update, but the nested route takes a different approach. The route causes React to retrieve the product's data from the server. The frontend then uses the data to create the markdown for that product and inserts the markdown into the existing page. The rest of the page (i.e., the title and the links) are untouched while the page's product area is updated.
Nested routes create a smoother navigation experience by decreasing the number of page reloads and making the page feel more responsive, like a native application.
How to Build It
For now, let's read some code to better understand the concept. You could also spin up a new React app and practice:
import React from 'react'
import { BrowserRouter, Link, Routes, Route } from 'react-router-dom'

const Home = () => <h4>Home Page</h4>
const Products = () => <h4>Products Page</h4>

export default function App() {
  return (
    <BrowserRouter>
      <nav>
        <Link to="/">Home Page</Link>
        <Link to="products">Products</Link>
      </nav>
      <Routes>
        <Route path="/" element={<Home />} />
        <Route path="products" element={<Products />} />
      </Routes>
    </BrowserRouter>
  )
}
This main component currently contains two routes: / to Home and products to Products. If the user types any other URL in the address bar, the app will log a warning telling you that a route for that URL does not exist.
Now let's say you wanted to add routes and components for two products: cameras (products/camera) and computers (products/computer). You can add each product as a child route of the Products component using nested routes.
The first step to add nested routes is to inform the products route that it allows for nested routes. Note the asterisk:
export default function App() {
  return (
    <BrowserRouter>
      <nav>
        <Link to="/">Home Page</Link>
        <Link to="products">Products</Link>
      </nav>
      <Routes>
        <Route path="/" element={<Home />} />
        <Route path="products/*" element={<Products />} />
      </Routes>
    </BrowserRouter>
  )
}
By changing the second route to products/*, you effectively tell the app to accept any route that starts with products and then delegate the route matching to the Products component.
We will make the Products component more complex so it is able to handle the nested routes:
function Products() {
  return (
    <>
      <h4>Products Page</h4>
      <nav>
        <Link to="camera">Camera</Link>
        <Link to="computer">Computer</Link>
      </nav>
      <Routes>
        <Route path="camera" element={<h4>Camera Page</h4>} />
        <Route path="computer" element={<h4>Computer Page</h4>} />
      </Routes>
    </>
  )
}
This is one of the coolest features in React Router: any component can have its routes inside of it intuitively.
Pro Tip: In theory, you could accomplish the same result using URL params, but with nesting, you don't have to worry about "grabbing" a URL segment with useParams.
Conclusion
Now, you should be ready to deal with any routing situation! Remember that you can always create routes and links by iterating over an array, meaning you don't need to hardcode every link and route in your script. Dynamic routes are especially useful when fetching JSON data and rendering content based on received data.
Module 1 Project: React Router
This project will require you to build two routes: one to show a list of movies and another for individual movie details. These two pages are often referred to as index pages and show pages, and you will build these pages repeatedly throughout your career. This is a great first step to getting comfortable with React routes as well as familiarizing yourself with basic website organization.
The module project contains advanced problems that will challenge and stretch your understanding of the module's content. The project has built-in tests for you to check your work, and the solution video is available in case you need help or want to see how we solved each challenge, but remember, there is always more than one way to solve a problem. Before reviewing the solution video, be sure to attempt the project and try solving the challenges yourself.
Instructions
The link below takes you to Bloom's code repository of the assignment. You'll need to fork the repo to your own GitHub account, and clone it down to your computer:
Starter Repo: React Router
- Fork the repository,
- clone it to your machine, and
- open the README.md file in VSCode, where you will find instructions on completing this Project.
- submit your completed project to the BloomTech Portal