Module 2: Events in the Browser
Events and Their Types
A dynamic application is not really dynamic if there's no user interaction!
The JS code running in the browser often relies on the user to decide what to do next. Virtually any action by the user, whether it's a simple mouse movement, click, or key down, is being monitored by the browser. Under the hood, the engine generates events which can then be accessed by the application. Sometimes the browser creates hundreds of them every second!
Events can also be triggered by timers, tasks finished (e.g. page loaded), and even the user's device condition, such as changes in screen orientation and resolution.
Events are a big part of web development. In fact, JavaScript is considered to be an event-driven programming language, with native objects and methods that have been designed from the ground up to facilitate the handling of events.
The asynchronous nature of JS allows you to build applications that run code in a non-continuous arbitrary order. Typically, the page will load, execute some start-up sequence, and automatically enter a "listening" state. From that point, events will determine what will be executed next.
You will now learn about some common types of events, and how to write code to react to them.
Understanding events
From the development point of view, events are objects created and exposed by the browser whenever specific situations occur. Most of the time, you will probably deal with mouse and keyboard events more than anything else, but there are dozens of types of events which can occur while the application is running.
Every single event object created is readily available to the application if the developer chooses to "listen" to it. The event object contains lots of information about that particular event: where it occurred on the page, what type of action or condition etc. Inside your script, you will have full control of events. Basically, you will decide which events to monitor, when to monitor them, and how to react!
For instance, you might want to hide a page element whenever a specific button (and only that button) is clicked, or you might want to change a header style when the ENTER key is pressed. The possibilities are endless.
The fundamental approach to JS event-driven programming is:
- Decide which event type will trigger a reaction
- Decide which target node/element should react to that event
- Write the actual code to handle the event (often called event listener, event handler, or callback function).
How to Build It
The basic functionality of the Kolors application is to shuffle over color palettes whenever the user clicks the "Change Palette" button.
Following the 3 steps above, you know exactly what to do next!
- The monitored event will be a mouse click
- The element which will listen to that event is the button
- And the event handler will update the color bars.
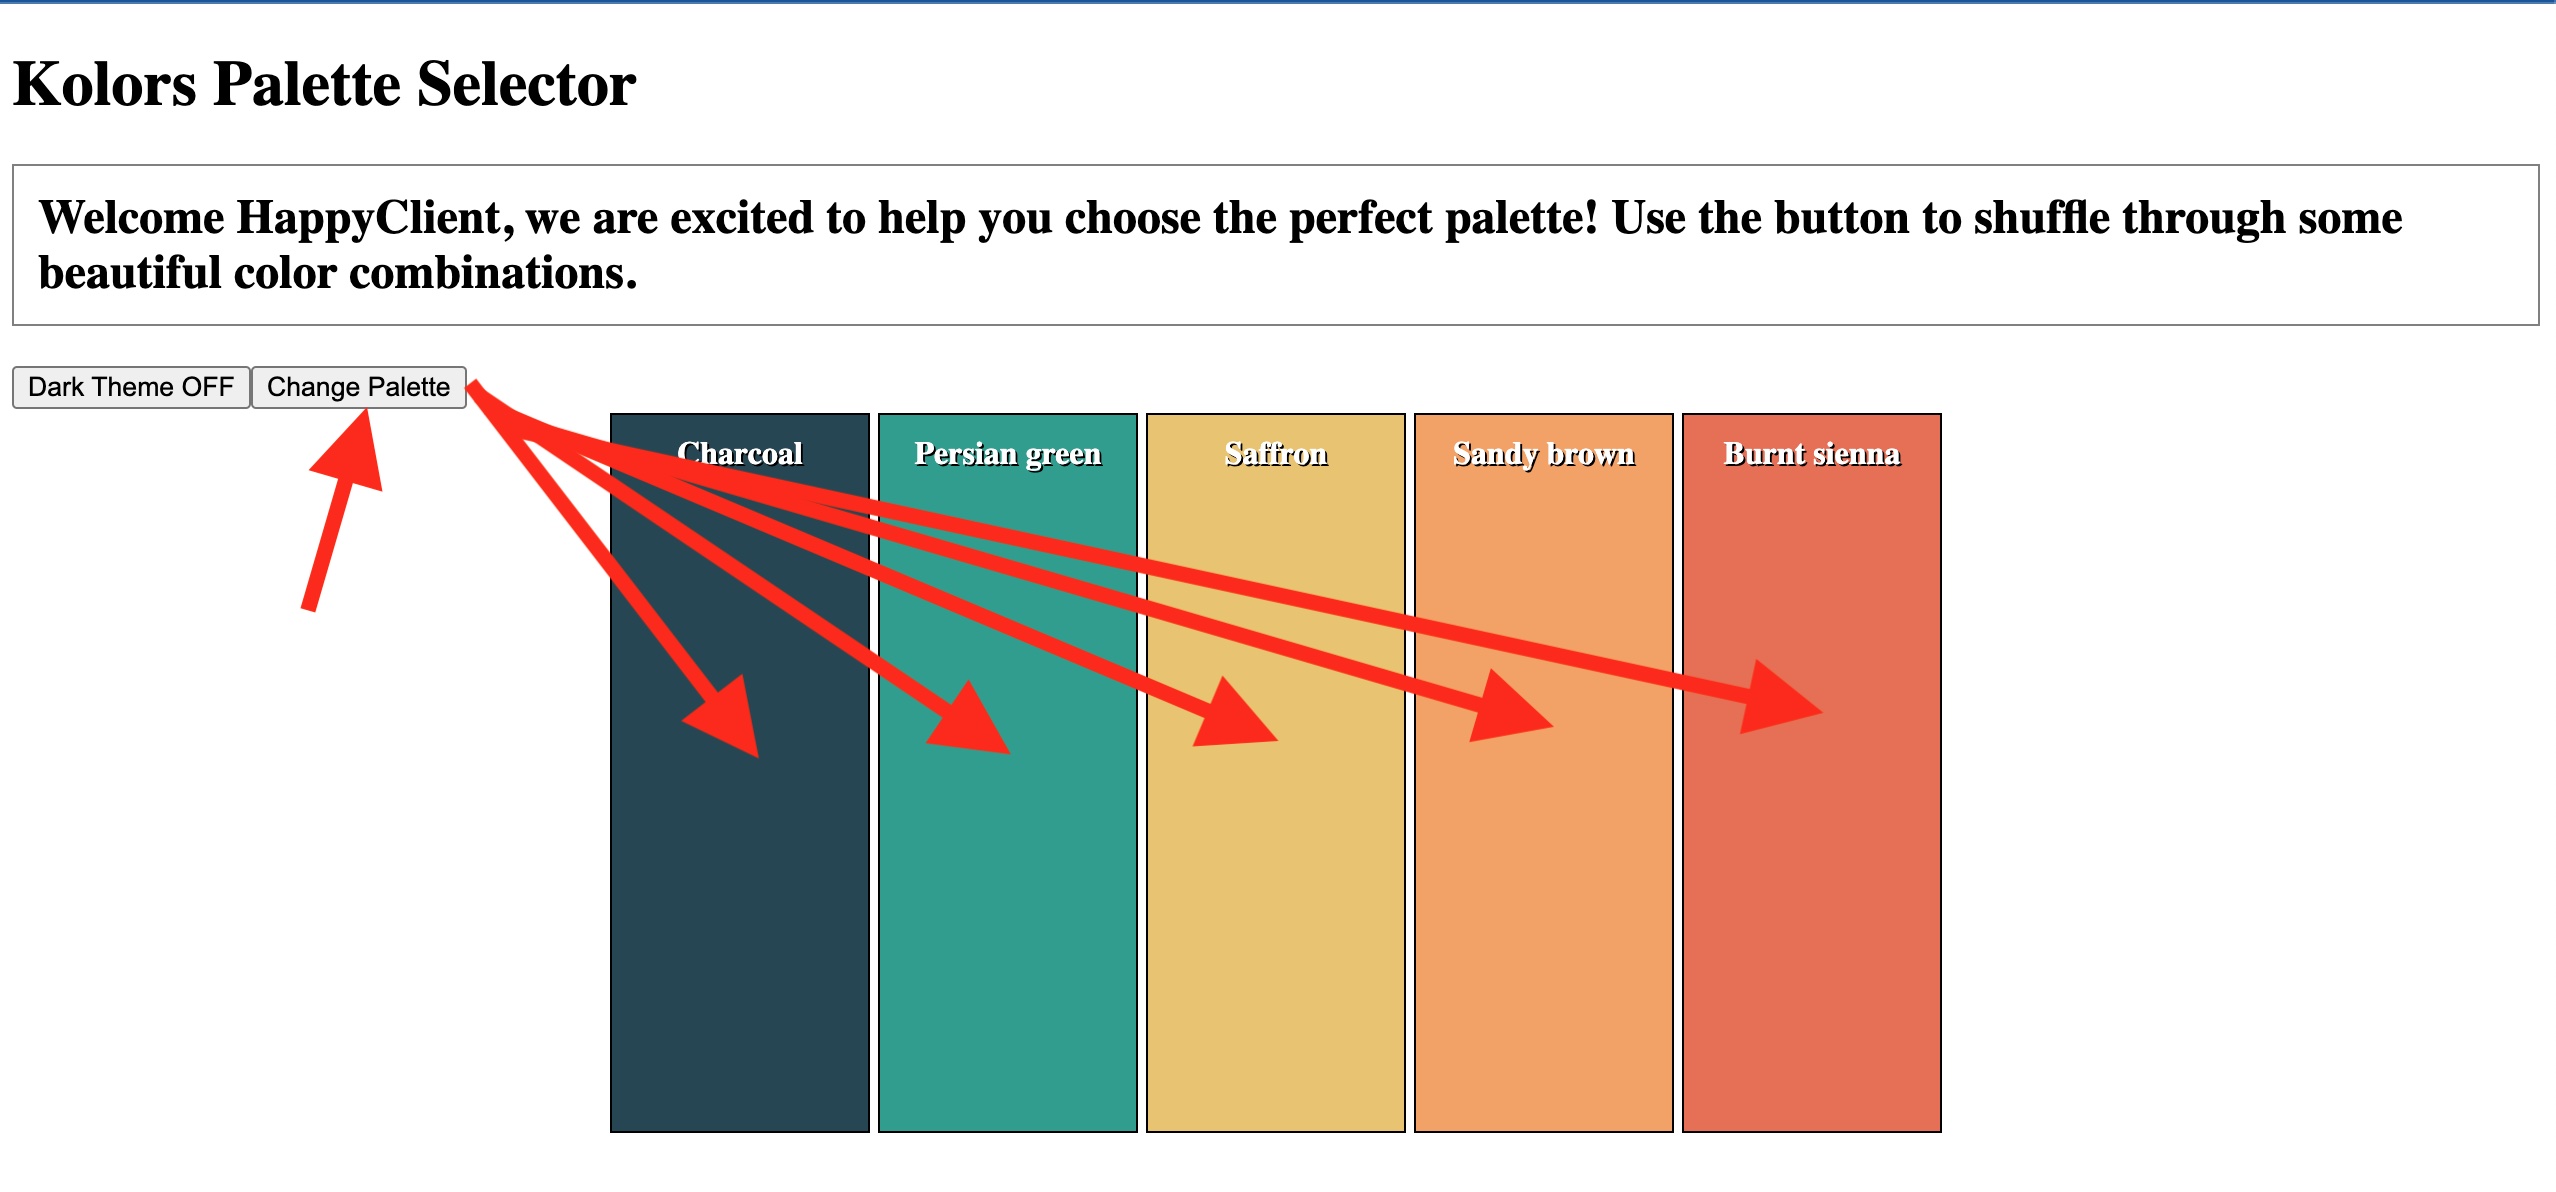
A 'click' event over the "Change Palette" button will run code to change all the color bars (text and background color).
But there's another event to be monitored: a click over the 'Dark Theme Off' should change the background of the page!
Understanding the types of events
There are many types of events reported by the browser. We mentioned that two of the most common types are related to MOUSE and KEYBOARD actions, such as movements, clicks, drags, key presses etc.
But if you refer to the documentation, you will see that events are classified under many types, such as Animation, Clipboard, CSS transition, Focus, Form, Gestures (used with touchscreens), Media, Print, etc. Your application can even tell if the device's (e.g. smartphone) battery is low and react accordingly!
Regardless of the type of the event, the process of handling them is always the same: think of events, targets, and reactions.
How to Build It
It looks like the 'click' event is going to be the focus of your application.
But Product Management has mentioned in the past that it would be great if users had the option to get more information about a particular color, such as the CMYK code for printing jobs.
You can add a 'mouseover' event to each color bar, so that by hovering the mouse over the color, the user will get more details about that particular color. That would be very dynamic and helpful! You design a mockup to show the PM:

Three boxes with unique colors. One black, one purple, and one white. A mouse hovers over the purple box, and an info box is next to the mouse, depicting what happens when a mouse hovers over a box. The info box has info about the color such as the color's name, RGB values, and hex value.
Design mock-ups are great to discuss functionalities with teammates and clients. Once they are approved, you can start coding.
Handling events with HTML attributes
Some years ago, It was common practice to manage events using inline HTML.
The code would be written like this:
<button onclick="btnClick()">Click Me</button>

<script>
  function btnClick() {
    console.log("Button Clicked")
  }
</script>
The onclick attribute specifies that this particular element (button) should react to an 'onclick' event by running the btnClick() function declared elsewhere in the code. Again, you choose the event type, the target element, and the callback function.
If you use this approach, as your application evolves, you might end up with several event handlers listening for different types of events on the same element, and the HTML inline notation could become hard to read and manage:
<button onclick="function1()" onfocus="function2()" ondblclick="function3">
  Try Me
</button>
In the code above, the button element is listening to different types of events, each one bound to a callback function.
Another possibility, which ultimately renders the same result, is to set the onclick attribute by JavaScript:
<button id="myBtn">Click Me</button>

<script>
  var btn = document.getElementById("myBtn")
  btn.onclick = btnClick

  function btnClick() {
    console.log("Button Clicked")
  }
</script>
This gives you more flexibility to manage events during runtime, and dynamically add reactions to your elements. Notice however that in this case the attribute is set to btnClick instead of btnClick(). It's just a convention in JavaScript.
The limitation of either approach above is that you can't add multiple callbacks to the same event. Whenever you set the 'onclick' attribute, it is overwritten, so any previous function assigned to it will cease to work.
Let's study this example. If you assign the onclick attribute to another callback function, the previous assignment will be lost.
<button id="btn1">Button 1</button>

<script>
  function function1() {
    console.log("Function1")
  }
  function function2() {
    console.log("Function2")
  }

  var btn1 = document.getElementById("btn1")
  btn1.onclick = function1
  btn1.onclick = function2
</script>
If you click on btn1, the console will only log:
"Function2"How to Build It
If you wanted to use HTML to handle events in the application, perhaps to make some tests while in development, you could revisit the code:
<body>
   <h1>Kolors Palette Selector</h1>
   <button type="button" id="palettebtn">Change Palette</button>
   <div class="container">
     <div class="rectangle"></div>
     <div class="rectangle"></div>
     <div class="rectangle"></div>
     <div class="rectangle"></div>
     <div class="rectangle"></div>
   </div>
 </body>
And modify it to:
<body>
   <h1>Kolors Palette Selector</h1>
   <button type="button" id="palettebtn" onclick="changePalette()">Change Palette</button>
   <div class="container">
     <div class="rectangle" mouseover="showInfo()"></div>
     <div class="rectangle" mouseover="showInfo()"></div>
     <div class="rectangle" mouseover="showInfo()"></div>
     <div class="rectangle" mouseover="showInfo()"></div>
     <div class="rectangle"></div>
   </div>
</body>
The onclick attribute of the button is pointing to the changePalette() function, and every single rectangle (div) has a mouseover attribute which will call the showInfo() function. Both function handlers will be coded inside the <script> section.
Conclusion
In the end, designing a dynamic application comes down to planning which elements will react to which events. Now it would be a good time for you to research about other event types.
If you are careful to plan and assign initial classes and IDs in the HTML, selecting elements and manipulating them through event handlers will be easy! Next, you will learn how to handle events using pure JS.
Adding Event Listeners in JS
You will now learn how to add event listeners using pure JavaScript. By designing a basic HTML foundation, you will be able to concentrate your development efforts on JS. Remember that some elements might be created dynamically during the runtime of the application, so it would be great if those elements could also listen and react to events dynamically!
The most common way to handle events these days is to use the .addEventListener() method and that's what you will learn in this Core Competency.
Handling an event with .addEventListener()
The .addEventListener() method allows you to specify all you need in a single line of code: target element, event type, and callback. Here's the syntax:
eventTarget.addEventListener(eventType, eventListener);Common targets are elements of the page, the document itself, or the window object. The eventType is a string containing the name of the event, such as "click" (instead of "onclick", beware of the notation!). And the eventListener is a reference to a function declared elsewhere (or inside the statement as an inline function).
This example below will register an event listener for clicks over a h1 section. Study the HTML and JS:
<body>
<h1 class="main-header">Events</h1>
<nav class="main-nav">
  <a href="#" class="nav-item">Home</a>
  <a href="#" class="nav-item">About</a>
  <a href="#" class="nav-item">Blog</a>
  <a href="#" class="nav-item">Contact</a>
</nav>
</body>
// the target element
const mainHeader = document.querySelector('.main-header');
// the event handler
const handleClick = () => {
mainHeader.textContent = 'Click!';
};
// the element is now ready to react to the event!
mainHeader.addEventListener('click', handleClick);The code above is straightforward: the text content of the header will change to 'Click!' whenever the user clicks over the h1 section.
Pro Tip: notice how we use 'handleClick' for the callback, instead of 'handleClick()'. In JS, the latter would make the function execute upon page load, which is not the desired behavior in this case.
You could accomplish the same result by declaring the callback function inline:
const mainHeader = document.querySelector('.main-header');

mainHeader.addEventListener('click', () => {
   mainHeader.textContent = 'Click!';
   }
);
The .addEventListener() method allows you to add multiple handlers for the same target, and even for the same event type!
mainHeader.addEventListener('click', handleClick2);
mainHeader.addEventListener('click', handleClick3);
mainHeader.addEventListener('mouseover', handleMouseOver);
If a 'click' event happens over the mainHeader element, all of the registered callback functions will run, typically in the order they have been attached.
How to Build It
Let's look at a more complete example. Here's the HTML structure for a color palette application:
<body>
   <h1>Kolors Palette Selector</h1>
   <button type="button" id="togglebtn">Dark Theme OFF</button>
   <button type="button" id="palettebtn">Change Palette</button>
   <div class="container">
     <div class="rectangle"></div>
     <div class="rectangle"></div>
     <div class="rectangle"></div>
     <div class="rectangle"></div>
     <div class="rectangle"></div>
   </div>
</body>
And here's the JavaScript code that sets up the event handlers:
// some code omitted

const paletteBtn = document.getElementById("palettebtn");
const toggleBtn = document.getElementById("togglebtn");
const colorBars = document.querySelectorAll(".rectangle");
// Three selections made for future use

const toggleTheme = () => {
   document.querySelector("body").classList.toggle("dark-theme");
};

const changePalette = () => {
   // existing code
};

const showInfo = () => {
   // to be implemented
};

// Three handlers defined!
Finally, we attach the handlers to the proper elements:
paletteBtn.addEventLister('click', changePalette);
toggleBtn.addEventLister('click', toggleTheme);
colorBars.forEach(el => {
   el.addEventListener('mouseover', showInfo);
});
Studying the event object
Sometimes you will need to access the event object to further inspect its properties. This is easy to do by declaring a parameter inside the callback.
Let's say you wanted to listen for the "Escape" key pressed on the keyboard and change the background color of the target element:
const handleEscape = (event) => {
   if (event.key == 'Escape') {
      event.target.style.backgroundColor = 'red';
   }
};

document.addEventListener('keydown', handleEscape);
Notice how the callback always receives the event object as the argument, and is able to access its properties (e.g. .key), including the actual target element (.target) and its own properties (e.g. .target.style).
The 'keydown' event will be triggered upon any key press, so you must inspect the event object if you need to know which key was actually pressed. As a bonus, by using event.target instead of a particular node reference, you can reuse the handler for any node on the page!
If you wanted to access the text content and the tag type of any element, you would write a generic handler function like this:
const handleClick = (event) => {
   event.target.textContent = `You clicked on a ${event.target.tagName} element`;
};
You can also access the event object just to log properties on the console, which is especially helpful when testing and debugging your application!
How to Build It
Let's implement the showInfo() function to display color details when hovering over color bars. We'll use the element's ID (set to the color name) to look up information in our colorInfo object:
const colorInfo = {
    charcoal: "hex: E4AC23, cmyk: (22,5,122,43), rgb: (120,34,65), family: Dark Minerals",
    saffron: "hex: 64B2C0, cmyk: (23,121,43,45), rgb: (12,223,67), family: Pale Yellows",
    // ... additional colors
};

const showInfo = (event) => {
    // Create floating element to show the info
    const infoBox = document.createElement('div');
    infoBox.style.position = 'absolute';
    infoBox.style.backgroundColor = '#fff';
    infoBox.style.padding = '10px';
    infoBox.style.border = '1px solid #ccc';
    infoBox.style.borderRadius = '4px';

    // Position next to mouse cursor
    infoBox.style.left = (event.pageX + 10) + 'px';
    infoBox.style.top = (event.pageY + 10) + 'px';

    // Get and display the color information
    infoBox.textContent = colorInfo[event.target.id];

    // Add to document
    document.body.appendChild(infoBox);

    // Remove box when mouse leaves color bar
    event.target.addEventListener('mouseout', () => {
        document.body.removeChild(infoBox);
    });
};
This implementation:
- Creates a floating div element styled to look like an info box
- Positions it near the mouse cursor using the event coordinates
- Looks up color info using the element's ID as the key
- Adds the box to the document
- Removes the box when the mouse leaves the color bar
Preventing the default behavior of an event
Some elements have a native default reaction to certain events. For example, the <a>
element will natively open a new page pointing to the href attribute. By default, every <a>
element is listening for clicks and is attached to an 'open page' handler. In the example below, clicking over
the link will open a new page by default:
<a href='https://bloomtech.com' id='home-link'>Bloomtech</a>What if for some reason you want to first redirect the user to another page or even change the reaction to
the click completely? You can use the .preventDefault() method of the event object!
Let's see how to do it.
Knowing that any event listener added by the application will execute before the default behavior, you can
attach a listener to the element and call the .preventDefault() method inside of it:
document.querySelector("#home-link").addEventListener("click", doSomethingElse);
// Handlers added by the user will run before the default reaction

const doSomethingElse = (event) => {
   event.preventDefault();
   // prevents default behavior
   // do something else
   // if other handlers are registered, they will also run
};
You need to register your own listener so that you can capture the event object and call
.preventDefault(). This will also make sure that only that particular element attached to the
handler will ignore the default behavior.
Pro-tip: Can you see how a malicious code could use this method to redirect the user to a fake page? That's why you should always verify the address bar after clicking on a link!
How to Build It
Let's practice preventing default behavior with a real example:
<a id="resources" href='https://en.wikipedia.org/wiki/Color_science' id='home-link'>Additional Resources</a>

const externalLink = document.querySelector("#resources");
externalLink.addEventListener("click", displayMessage);

const displayMessage = (event) => {
   event.preventDefault();
   window.alert("You will be redirected to a third party website!");
   window.open(externalLink.href, '_blank');
};
When clicking on the link, the user will get a message pop-up and the code will halt execution until the user acknowledges and clicks OK. Next, the browser will open a new tab with the URL from the href attribute.
This pattern is commonly used when:
- Redirecting users to external sites
- Warning users about leaving your domain
- Getting user confirmation before navigation
Conclusion
In this Core Competency you have learned not only how to add event listeners with JS, but how to access the event object and even prevent default behaviors.
Take some time to log an event object in the console and study all of its properties and methods. It is important that you feel comfortable with the event object as you'll be using it in a variety of ways in your career, and knowing its properties will help you solve many problems. There's a lot you can do by accessing the event inside the handler.
Next, you will learn how to deal with event propagation and gain full control of event handling in your application!
Event Propagation
In the previous Core Competency, you learned how to add event listeners to elements and how to handle events using the event object. Now, you will learn how to control the way events are handled and propagated in your application.
For this next Core Competency, it is helpful to think of events like entities that are "fired" from a particular element and propagate up the DOM tree. On its way to the top of the tree (usually the document root node), the event will "touch" other elements and will also trigger those that are set to listen and react to that particular type of event.
If there are no event listeners on this path, the event will eventually "die" and nothing will happen in the application. In other words, a single user interaction might trigger multiple callback functions, over multiple targets, even if that's not the intention of the user.
Your application must be able to deal with the propagation of events and decide which elements should react, and in which order they should react!
Understanding the phases of propagation
Let's study an example of event propagation. Consider the code below:
HTML
<body>
  <h1 class="main-header">Events</h1>
  <div class="menu">
    <h2 id="menu-header">MENU</h2>
    <a href="#" id="home-link">Home</a>
    <a href="#" id="about-link">About</a>
    <a href="#" id="blog-link">Blog</a>
    <a href="#" id="contact-link">Contact</a>
  </div>
</body>
JS
document.querySelector(".menu").addEventListener("click", handleDiv);
// click handler attached to the div.menu element

document.querySelector("#menu-header").addEventListener("click", handleH2);
// another click handler attached to the h2#menu-header element
The code above is attaching a distinct click handler to each of the two elements.
Whenever the user clicks over the h2#menu-header element, the browser will trigger a click event and handleH2() will be called, as expected, because that element is configured to listen to that event.
But the event will continue to propagate up to the div.menu element, because it is the parent of the h2 element. Since this div is also configured to listen to the click event, it will call handleDiv(). Then the event will reach the body and finally, the document root, and both will ignore it.
Regardless of the user's intentions, clicking over this particular h2 means that the user is also clicking over other elements: the parent div, the body, and the document.
These are the propagation steps, from 1 to 4:
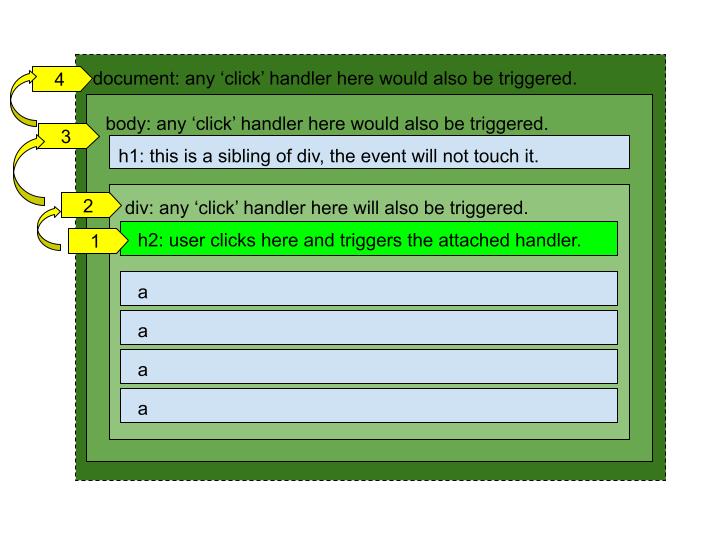
- h2:user clicks and triggers the attached handler -->
- div: any "click" handler will also be triggered -->
- body: any "click" handler would also be triggered; h1: This is a sibling of div, the event will not touch it -->
- document: any "click" handler here would also be triggered
The bubbling-up (propagation phase) will make the event trigger handlers following the order above, from 1 to 4. In other words, from the inner most element to the last parent. But you may change the default behavior and have a particular handler execute before the others! All you need to do is add true as a third argument when attaching the handler:
// click handler attached to the div.menu element will be executed before the propagation phase.
document.querySelector(".menu").addEventListener("click", handleDiv, true);

// the other click handler attached to the h2#menu-header element will be executed normally during the propagation phase.
document.querySelector("#menu-header").addEventListener("click", handleH2);
If you have multiple handlers set as true, they will execute in reverse order, meaning, from the outermost element, to the innermost child.
For all of the available options when attaching an event listener, please refer to this documentation.
How to Build It
Let's look at a practical example of event propagation and how to control it. We'll build a color palette selector that demonstrates event handling and propagation:
<body>
  <h1>Kolors Palette Selector</h1>
  <button type="button" id="togglebtn">Dark Theme OFF</button>
  <button type="button" id="palettebtn">Change Palette</button>
  <div class="container">
    <div class="rectangle"></div>
    <div class="rectangle"></div>
    <div class="rectangle"></div>
    <div class="rectangle"></div>
    <div class="rectangle"></div>
  </div>
</body>
To handle mouse events on the color bars, we can attach multiple event listeners using a forEach loop:
colorBars.forEach(el => {
  el.addEventListener('mouseover', showInfo);
  el.addEventListener('wheel', shuffleColor);
});
The wheel event handler needs to check the scroll direction using event.deltaY:
const shuffleColor = (event) => {
  if (event.deltaY > 0) {
    // get next family color from array/object
    // update the color bar title, color, info box
  }
  else if (event.deltaY < 0) {
    // get previous family color from array/object
    // update the color bar title, color, info box
  }
};
When testing the wheel event, you'll notice the page scrolls up and down unintentionally. This is because
the wheel event propagates up through the DOM tree to parent elements. To prevent this default scrolling
behavior, you'll need to call event.preventDefault() on the wheel event.
You can test which parent element is causing the scroll by attaching wheel event listeners to each parent in the chain:
// Test each parent element
document.querySelector('.container').addEventListener('wheel', e => {
  console.log('Container wheel event');
  e.preventDefault();
});

document.body.addEventListener('wheel', e => {
  console.log('Body wheel event');
  e.preventDefault();
});

document.addEventListener('wheel', e => {
  console.log('Document wheel event');
  e.preventDefault();
});
Find the target and the current target of an event
If you refer back to the image in the previous page, at step 1, the original click event happens over the h2 element. This h2 element is the actual target of the event, the origin, where it all started, and can be accessed by the application through the read-only .target property:
const handleH2 = (event) => {
  console.log('the target element of the event is:', event.target);
  // logs the original element where the event was created
  event.target.style.backgroundColor = "yellow";
  // changes the background color of the target h2
};
If other handlers up the tree access the event.target property, it will always refer to the same h2 element where the event was initially fired from: the h2#menu-header. The handler below, although called by a different parent element (div.menu) , will perform the exact same thing as the previous handler:
const handleDiv = (event) => {
  console.log('the target element of the event is:', event.target);
  // logs the original element where the event was created
  event.target.style.backgroundColor = "yellow";
  // changes the background color of the target h2
};
If a handler needs to access the actual element that it is attached to (which is often the case!), it can use the .currentTarget property:
const handleDiv = (event) => {
  event.currentTarget.style.backgroundColor = "yellow";
  // changes the background color of the div, not the h2!
};
How to Build It
You can use .target and .currentTarget to actually understand how the wheel event
is propagating in your document. Add another simple handler and attach it to all the parent elements of the
color bars.
Use the .tagName property to identify the actual element:
const showTarget = (event) => {
  console.log('target:', event.target.tagName);
  console.log('currentTarget:', event.currentTarget.tagName);
  console.log(' ');
};

document.addEventListener('wheel', showTarget);
document.querySelector('body').addEventListener('wheel', showTarget);
document.querySelector('.container').addEventListener('wheel', showTarget);
What happens when you scroll the wheel while moving the mouse over different parts of the page?
Stopping event propagation
Ask yourself: do you really want your application to trigger all the event handlers up the tree? In this particular scenario from the previous example, do you want to change the background color of both elements? Do you want to run both the h2 handler AND the parent div handler? Probably not. So you need a way to control the propagation of events!
Fortunately, the event object has another method just for that! By calling .stopPropagation(),
you can catch the event on a particular element and stop it from propagating to other elements!
If you rewrite the click handler attached to the h2#menu-header to:
const handleH2 = (event) => {
  event.stopPropagation();
  // prevents parents from triggering their handlers
  event.currentTarget.style.backgroundColor = "yellow";
};
You can now be sure that the click event will "die" inside this handler and will not propagate further, effectively preventing any other click handlers from running!
How to Build It
As you have concluded, you don't want other elements reacting to the mouse wheel and make the document scroll up and down in the window.
You can try two different approaches:
const showTarget = (event) => {
  event.preventDefault();
  // this option will prevent the document from scrolling up and down, although it will still receive the event and execute the code below (log the targets)
  event.stopPropagation();
  // this option will stop propagation when you use the wheel over the color bars. but will still scroll the page when you move the wheel outside this target, over the document.
  console.log('target:',event.target.tagName);
  console.log('currentTarget:',event.currentTarget.tagName);
  console.log(' ');
};

document.addEventListener('wheel', showTarget);
document.querySelector('body').addEventListener('wheel', showTarget);
document.querySelector('.container').addEventListener('wheel', showTarget);
After some testing, you conclude that the ideal approach is to add .stopPropagation() to the shuffleColor() handler:
const shuffleColor = (event) => {
  event.stopPropagation();
  if (event.deltaY > 0) {
    // get next family color from array/object, update the color bar title, color, info box
  }
  else if (event.deltaY < 0) {
    // get previous family color from array/object, update the color bar title, color, info box
  }
};
Conclusion
Knowing how to handle events is extremely important to a great design and implementation. Remember to use your console to log events so you can better visualize how propagation is happening and which elements have a default action.
You can always access the original target from anywhere in your application, as well as modify default actions and "kill" events when you don't want them to traverse the DOM.
Module 2 Project: Events in the Browser
In this project, you will practice using "vanilla" JavaScript to manipulate the DOM without any frameworks. Your goal is to build a video game using only JavaScript. By the time you finish this project, you will have gained the foundation needed to build games such as Minesweeper, Connect-Four, Battleship, or any grid-based game you wish to create.
The module project contains advanced problems that will challenge and stretch your understanding of the module's content. The project has built-in tests for you to check your work, and the solution video is available in case you need help or want to see how we solved each challenge, but remember, there is always more than one way to solve a problem. Before reviewing the solution video, be sure to attempt the project and try solving the challenges yourself.
Instructions
The link below takes you to Bloom's code repository of the assignment. You'll need to fork the repo to your own GitHub account, and clone it down to your computer:
Starter Repo: Events in the Browser
- Fork the repository,
- clone it to your machine, and
- open the README.md file in VSCode, where you will find instructions on completing this Project.
- submit your completed project to the BloomTech Portal