Module 3: Join and Reshape Data
Module Overview
In this module, you'll master essential data manipulation techniques in pandas. You'll learn how to concatenate and merge datasets, use Group By operations for data exploration, understand the principles of tidy data, and transform data structures using melt and pivot functions. These skills are fundamental for effective data analysis and preparation.
Learning Objectives
- Combine and merge multiple datasets using concatenation and merge operations
- Explore and analyze data using Group By operations
- Understand and implement the principles of tidy data
- Transform data structures using melt and pivot functions
Warm Up- Work With Dates and Times in Pandas
Overview
Working with data that contains dates and times is something that you will come across often. The two
values, dates and times, are often combined into a single object called a datetime (in
general).
In Python, there are two separate collections of tools or objects specifically for working with data in
a datetime format: the built-in Python DateTime module and the pandas Timestamp
object.
Python Datetime
Even though we'll work primarily with the pandas objects, it's essential to understand how the Python
built-in one works. The datetime module is straightforward to use. We'll use the built-in
datetime object to assign the year, month, and day values here.
from datetime import datetime

date = datetime(year=2017, month=8, day=21, hour=13, minute=23, second=30)
print(date)
2017-08-21 13:23:30
Pandas Timestamp
The pandas Timestamp object builds on the datetime module and also incorporates the NumPy datetime64 dtype. In pandas, a Timestamp object is created by using the pandas to_datetime method.
import pandas as pd

date = pd.to_datetime("21st of August, 2017")
print(date)
Timestamp('2017-08-21 00:00:00')
Using the 'date' example from above, let's select the year, month, and day separately.
import pandas as pd

date = pd.to_datetime("21st of August, 2017")
print("Year:", date.year)
print("Month:", date.month)
print("Day:", date.day)
2017 8 21
Follow Along
Let's revisit the UFO data set and convert the time column to a pandas Timestamp object. We'll read in the data and look at the first few rows.
import pandas as pd

ufo_df = pd.read_csv('scrubbed.csv')
ufo_df.head(5)| datetime | city | state | country | shape | duration (seconds) | comments | latitude | longitude | |
|---|---|---|---|---|---|---|---|---|---|
| 0 | 10/10/1970 16:00 | bellmore | ny | us | disk | 1800 | silver disc seen by family and neighbors | 40.668611 | -73.527500 |
| 1 | 10/10/1971 21:00 | lexington | nc | us | oval | 30 | green oval shaped light over my local church p... | 35.823889 | -80.253611 |
| 2 | 10/10/1974 23:00 | hudson | ks | us | light | 1200 | The light chased us. | 38.105556 | -98.659722 |
| 3 | 10/10/1976 20:30 | washougal | wa | us | oval | 60 | Three extremely large lights hanging above nea... | 45.582778 | -122.352222 |
| 4 | 10/10/1980 23:30 | manchester | nh | us | light | 300 | A red glowing sphere stopped and watched me. | 42.995556 | -71.455278 |
Checking the data type of the 'datetime' column with ufo_df['datetime'].dtype returns
dtype('O').
To convert the whole column into pandas Timestamp objects, provide the
to_datetime method with the
column and the format of the datetime text; in this case, we'll let pandas do the work and infer the
format.
One thing to note with pandas is the inferred values for hours in a day span from 0-23. If we check the
value counts of the 'datetime' column with ufo_df['datetime'].value_counts() we can see
that the column contains values for hours spanning from 1-24. This will cause an error when we go to
convert this column. In order to circumvent this, we can apply a .str.replace() method to
the dataframe column, replacing the value 24 with the value 00.
import pandas as pd

ufo_df = pd.read_csv('scrubbed.csv')

# Create a new datetime column with correctly formatted dates and times
ufo_df['datetime'] = pd.to_datetime(ufo_df['datetime'].str.replace(" 24:", " 00:"), infer_datetime_format=True)
print(ufo_df['datetime'].head())
0 1970-10-10 16:00:00 1 1971-10-10 21:00:00 2 1974-10-10 23:00:00 3 1976-10-10 20:30:00 4 1980-10-10 23:30:00 Name: datetime, dtype: datetime64[ns]
Now we can see the time is formatted correctly, and we have a datetime64[ns] object.
Challenge
Now it's your turn to convert some text or string columns to a Timestamp object. To also
practice some
of our previous skills, you will find some data to read in. Here are some suggestions to get started:
- Find, download, or create a data set that includes a date and time in some format
- Read the data into a DataFrame
- Check the data type to confirms that it isn't already in a
datetimeordatetime64format - Use the
to_datetime()method to convert; try out theformatargument if you are having trouble
Additional Resources
Objective 01 - Concatenate Data Using the Pandas Concat Method
Overview
Data sets come in all shapes and sizes, and sometimes we need to combine them in various ways. This type
of data wrangling task is very well suited for pandas. There are several different tools that we can
use, from very simple to very complex DataFrame combinations. We'll begin with one of the easiest:
concatenation using the pandas method pd.concat.
Concatenation means to join two things together. For example, with string concatenation, we join two or more strings end-to-end. However, we'll see that for a structure like a DataFrame, "end" has a slightly different meaning.
One way to join files and also display them, would be with the use of Unix terminal command
cat, which is short for concatenate.
Introduction to pd.concat()
To become more familiar with this method, let's look at the default parameters of
pd.concat().
# Import libraries
import pandas as pd
import numpy as np

# Display the arguments for pd.concat()
pd.concat
We can see that there are a number of parameters to use with this method. To start with, our use cases
will focus on the axis and join parameters.
Follow Along
To demonstrate how to combine DataFrames we need to create a few to practice with.
# Make DataFrames
df1 = pd.DataFrame(np.random.rand(3,2),
                  columns = ['cat', 'dog'])
df2 = pd.DataFrame(np.random.rand(3,2),
                  columns = ['cat', 'dog'])

# Print out the DataFrames
print(df1); print(df2)
cat dog
0 0.693574 0.094608
1 0.045537 0.449816
2 0.077305 0.590424
cat dog
0 0.685117 0.628959
1 0.079331 0.955059
2 0.530680 0.949267Using pd.concat
We'll combine them along the row axis (axis=0) which is the default setting for
pd.concat().
# Concatenate along the row axis
pd.concat([df1, df2])| cat | dog | |
|---|---|---|
| 0 | 0.693574 | 0.094608 |
| 1 | 0.045537 | 0.449816 |
| 2 | 0.077305 | 0.590424 |
| 0 | 0.685117 | 0.628959 |
| 1 | 0.079331 | 0.955059 |
| 2 | 0.530680 | 0.949267 |
We can see that the concatenation preserves the indexes, so we now have some that repeat. One way to
avoid this is to set the parameter ignore_index=True.
Say we have another DataFrame, and we would like to concatenate them along the column axis. We need to
set the argument axis=1 to do this. We'll create a DataFrame with different column names,
combine them, and view the results to test this out.
# Create the new DataFrame
df3 = pd.DataFrame(np.random.rand(3,2),
                  columns = ['bird', 'horse'])

# Concatenate it with one of the previous examples
pd.concat([df1, df3], axis=1)| cat | dog | bird | horse | |
|---|---|---|---|---|
| 0 | 0.693574 | 0.094608 | 0.818225 | 0.971892 |
| 1 | 0.045537 | 0.449816 | 0.306902 | 0.428235 |
| 2 | 0.077305 | 0.590424 | 0.929212 | 0.186076 |
In the above examples, df1 and df2 have the same column names; it was easy to
combine them. What do we do if we don't have any column names in common but still want to combine the
DataFrames? There are additional arguments that we can pass to pd.concat.
Using the join argument, we can combine two DataFrames with overlapping columns. The
default value of join is outer, which is a union of all of the columns. First,
let's create a few more DataFrames to practice.
# Create the DataFrames

data4 = {'Alpaca':['A1', 'A2', 'A3'], 'Bird':['B1', 'B2', 'B3'],
        'Camel':['C1', 'C2', 'C3']}
df4 = pd.DataFrame(data4)
print(df4)

data5 = {'Bird':['B3', 'B4', 'B5'], 'Camel':['C3', 'C4', 'C5'],
        'Duck':['D3', 'D4', 'D5']}
df5 = pd.DataFrame(data5, index=[3,4,5])
print(df5)

# Concatenate with default join='outer'
print(pd.concat([df4, df5], sort=False))
Alpaca Bird Camel
0 A1 B1 C1
1 A2 B2 C2
2 A3 B3 C3
Bird Camel Duck
3 B3 C3 D3
4 B4 C4 D4
5 B5 C5 D5
Alpaca Bird Camel Duck
0 A1 B1 C1 NaN
1 A2 B2 C2 NaN
2 A3 B3 C3 NaN
3 NaN B3 C3 D3
4 NaN B4 C4 D4
5 NaN B5 C5 D5
We can see in the above example that those cells that did not have any data available, now have all ,
NaN values. To join only those columns that are common to the two DataFrames, we can use the
join='inner' argument.
# Concatenate with default join='inner'
print(pd.concat([df4, df5], join='inner'))
Bird Camel
0 B1 C1
1 B2 C2
2 B3 C3
3 B3 C3
4 B4 C4
5 B5 C5Now the only columns that remain are the ones that the two DataFrames had in common.
Challenge
Using the same process as above, practice concatenating some DataFrames that you create. You should follow these general steps:
- Create DataFrames with either the
np.arraysyntax or by creating a dictionary; create something that is ~10 rows. - Concatenate along either the rows or columns, depending on the column names you made; experiment!
- Use
pd.concatwith thejoinargument.
Additional Resources
Objective 02 - Merge Data Using Pandas Merge
Overview
There are other ways to combine DataFrames, especially when there are overlapping rows. For example, the
pandas pd.merge() method uses database-style joins, similar to what you might see in SQL
later in this course.
Introduction to pd.merge()
To become more familiar with this method, let's look at the available arguments and defaults for this function.
# Import libraries
import pandas as pd
import numpy as np

# Display the arguments for pd.merge()
pd.merge
<function pandas.core.reshape.merge.merge(left, right, how='inner', on=None, left_on=None, right_on=None, left_index=False, right_index=False, sort=False, suffixes=('_x', '_y'), copy=True, indicator=False, validate=None)>
Some of the arguments are similar to what we have seen already with concatenation. But with
pd.merge() we can do a lot of different types of joins. Let's summarize some of the
different parameters.
- left - one of the DataFrames to merge
- right - the other DataFrame to merge
- how - specifies the kind of merge to make
- on - the column on which to merge; needs to be in both DataFrames
- left_on - the column to join on in the left DataFrame
- right_on - the column to join on in the right DataFrame
- left_index or right_index - use the index from the left/right DataFrame as the join key(s)
Let's start with one of the more basic joins, the same as the pd.concat() column-wise
example we completed previously.
Follow Along
We'll create some more DataFrames for practice.
# Create DataFrames
df1 = pd.DataFrame({'day': ['Mon', 'Tues', 'Wed', 'Thurs', 'Fri'],
                   'weather': ['sunny', 'windy', 'rainy', 'cloudy', 'cold']})

df2 = pd.DataFrame({'day': ['Wed', 'Fri', 'Mon', 'Thurs', 'Tues'],
                   'temp': [88, 75, 62, 65, 53]})

# Display the DataFrames
display(df1)
display(df2)

# Merge them with the default values
df3 = pd.merge(df1, df2)
display(df3)| day | weather | |
|---|---|---|
| 0 | Mon | sunny |
| 1 | Tues | windy |
| 2 | Wed | rainy |
| 3 | Thurs | cloudy |
| 4 | Fri | cold |
| day | temp | |
|---|---|---|
| 0 | Wed | 88 |
| 1 | Fri | 75 |
| 2 | Mon | 62 |
| 3 | Thurs | 65 |
| 4 | Tues | 53 |
| day | weather | temp | |
|---|---|---|---|
| 0 | Mon | sunny | 62 |
| 1 | Tues | windy | 53 |
| 2 | Wed | rainy | 88 |
| 3 | Thurs | cloudy | 65 |
| 4 | Fri | cold | 75 |
Our new DataFrame df3 only has one column for the 'day'; pd.merge() recognized
the shared column and merged them on this column. It's also important to note that the order of the days
(rows) in each DataFrame doesn't have to be the same for them to merge.
There will be cases where the column names don't match, which is where the left_on and
right_on parameters are useful. Let's use the same DataFrames as above but instead change
the column name on one of them.
# Change the column name day -> day_of_week
df2_new = pd.DataFrame({'day_of_week': ['Wed', 'Fri', 'Mon', 'Thurs', 'Tues'],
                   'temp': [88, 75, 62, 65, 53]})

# Merge with left and right columns
df4 = pd.merge(df1, df2_new, left_on='day', right_on='day_of_week')
display(df4)| day | weather | day_of_week | temp | |
|---|---|---|---|---|
| 0 | Mon | sunny | Mon | 62 |
| 1 | Tues | windy | Tues | 53 |
| 2 | Wed | rainy | Wed | 88 |
| 3 | Thurs | cloudy | Thurs | 65 |
| 4 | Fri | cold | Fri | 75 |
There is a redundant column where 'day' and 'day_of_week' both have the same values. We can use the
.drop() method to remove right after we join the DataFrames.
# Drop the day_of_week column
df5 = pd.merge(df1, df2_new, left_on='day', right_on='day_of_week').drop('day_of_week', axis=1)
display(df5)| day | weather | temp | |
|---|---|---|---|
| 0 | Mon | sunny | 62 |
| 1 | Tues | windy | 53 |
| 2 | Wed | rainy | 88 |
| 3 | Thurs | cloudy | 65 |
| 4 | Fri | cold | 75 |
Joins
So far, we have not considered a scenario where there are missing values in the columns of data sets we want to merge or join. Let's look at one such example, by creating two new DataFrames containing sample information about pets in an animal rescue site. Let knowingly not include information on some of the animals, and demonstrate what happens with an 'inner' and 'outer' join on those two DataFrames .
We'll use a sample of information about pets in an animal rescue, where we won't have all of the data on all of the animals. It will be easier to demonstrate both an 'inner' and 'outer' join with the same DataFrames.
# Create the DataFrames
df6 = pd.DataFrame({'name': ['Snowball', 'Bob', 'Tweetie', 'Fluffy'],
                   'type': ['cat', 'rat', 'bird', 'dog']})

df7 = pd.DataFrame({'name': ['Snowball', 'Bob'],
                   'weight': [400, 749]})

# Display before merging
display(df6); display(df7)

# Merge in two different ways
df8_outer = pd.merge(df6, df7, how='outer')
df8_inner = pd.merge(df6, df7, how='inner')

# Display after merging
display(df8_outer); display(df8_inner)| name | type | |
|---|---|---|
| 0 | Snowball | cat |
| 1 | Bob | rat |
| 2 | Tweetie | bird |
| 3 | Fluffy | dog |
| name | weight | |
|---|---|---|
| 0 | Snowball | 400 |
| 1 | Bob | 749 |
| name | type | weight | |
|---|---|---|---|
| 0 | Snowball | cat | 400.0 |
| 1 | Bob | rat | 749.0 |
| 2 | Tweetie | bird | NaN |
| 3 | Fluffy | dog | NaN |
| name | type | weight | |
|---|---|---|---|
| 0 | Snowball | cat | 400 |
| 1 | Bob | rat | 749 |
We started with animal names, types, and weights but didn't have weight data for all animals. So the 'outer' join used all of the animals and filled in 'NaN' for the missing weights. This type of join is called a union. The 'inner' join only includes rows with data in all three columns; this type is an intersection.
Using the .join method
There is also a .join() method that is available with DataFrame objects. This method is a
convenient way to join DataFrames without making a full merge() call. Some of the
parameters we can use here are:
- other - the other DataFrame you are joining
- on - the column or Index on which to join the other DataFrame (default is the Index)
- how - similar to merge the choices are left, right, outer, inner
We need to use set_index on our DataFrames so that they can be joined on those indexes.
# Reset indices
df1a = df1.set_index('day')
df2a = df2.set_index('day')

# Join on the new index='day'
df1a.join(df2a, on='day')| day | weather | temp |
|---|---|---|
| Mon | sunny | 62 |
| Tues | windy | 53 |
| Wed | rainy | 88 |
| Thurs | cloudy | 65 |
| Fri | cold | 75 |
Challenge
There were a few types of merges that we didn't demonstrate above, so this is a good time to practice
the other methods. Using the examples above, you'll create some DataFrames and then merge()
using both'inner' and 'outer' joins. Also try out the .join() method and see how it
compares to the results from your merges.
Additional Resources
Objective 03 - Define the Concept of Tidy Data and Describe the Format
Overview
The term "tidy data" is something you have probably come across a lot. You might have a general idea of what it means, but we'll present the standard model of tidy data here. One of the first things you probably encountered when working with data is how much time you spent cleaning it: dealing with missing values, formatting, renaming columns, etc. In addition to general cleaning, it's also essential to make sure the data is in a tidy format.
Tidy data principles describe a standard for organizing the values in a data set. Data in a clear and standard format can be explored and manipulated with any tools that expect this format. In short, standardizing our data in a tidy format makes it faster and easier to analyze and produce results.
Tidy Data Format
Much of the data we deal with is in the form of a table (tabular data). It usually contains columns (often labeled) and rows (sometimes labeled). But, there isn't a universal standard format for these tables. A messy Excel spreadsheet comes to mind, with no standard for organizing the rows and columns.
"Tidy Data" is commonly used in Statistics as an alternative term for data matrix. Hadley Wickham (see reference linked below), later defined it in context of data sets. Tiny Data is structured such that:
- Each variable is a column
- Each observation forms a row
For example, a variable could be a measurement (mass, density, temperature) or an attribute (population, quantity); these are just a few examples. Observations are across rows, and typical examples are dates, times, indexes, or locations like latitude/longitude. The intersection of the variable and observation is the value. An example of this could be the temperature (column/variable) at a given time (row/observation).
Follow Along
Let's look at an example where we take a "messy" data set and transform it into a tidy format. The following table lists a student_ID and a score (ques1, ques2, etc.) and title (title1, title2, etc.) for that student.
| student_ID | ques1 | title1 | ques2 | title2 | ques3 | title3 |
|---|---|---|---|---|---|---|
| 11926 | 45 | readcsv | 78 | groupby | 86 | forloop |
| 82275 | 93 | ifthen | 93 | merge | 94 | readcsv |
| 40124 | 83 | melt | 63 | readcsv | 83 | forloop |
| 29113 | 34 | merge | 56 | groupby | 85 | ifthen |
| 48454 | 87 | readcsv | 87 | groupby | 62 | forloop |
This data set could be displayed in tidy format by using a column for question number, question title, and score. A possible tidy format is shown below:
| student_ID | ques_num | ques_title | score |
|---|---|---|---|
| 11926 | 1 | readcsv | 45 |
| 11926 | 2 | groupby | 78 |
| 11926 | 3 | forloop | 86 |
| 82275 | 1 | ifthen | 93 |
| 82275 | 2 | merge | 93 |
| 82275 | 3 | readcsv | 94 |
| 40124 | 1 | melt | 83 |
| 40124 | 2 | readcsv | 63 |
| 40124 | 3 | forloop | 83 |
| 29113 | 1 | merge | 34 |
| 29113 | 2 | groupby | 56 |
| 29113 | 3 | ifthen | 85 |
| 48454 | 1 | readcsv | 87 |
| 48454 | 2 | groupby | 87 |
| 48454 | 3 | forloop | 62 |
While the original data was almost in a tidy format, numeric information is in the column name labels (ques1, ques2, ques3). With the transformed data, it's much easier to sort and group by the question number and title when they are all listed in the same column.
Challenge
Using some of the example tables found here (scroll down for the table), identify how they are "messy" and how they would need to be within a tidy format. Make sure to identify the problems with the original data set and how you could correct it. For this exercise, you don't need to load the data into pandas or write out the specific code; it's enough, for now, to be able to identify how you would transform it. Draw a picture if needed!
Additional Resources
Objective 04 - Transition Between Tidy and Wide Data Formats With the Melt and Pivot Methods
Overview
We've already introduced the basics for tidy data structure and looked at examples from practice data sets before and after tidying. We can now comprehend how easy and efficient it is, to explore the data, when the columns and rows are somewhat standardized.
Wide and Long Format
While data appears in many formats, we can somewhat generalize it into two types: wide and long. The long format looks very similar to the tidy format, where each column is a variable and each row is an observation. From the last objective, the transformed student data is in a long format. "Long" refers to the number of rows: we need more rows to hold the data in this format.
Long format
| student_ID | ques_num | ques_title | score |
|---|---|---|---|
| 11926 | 1 | readcsv | 45 |
| 11926 | 2 | groupby | 78 |
| 11926 | 3 | forloop | 86 |
| 82275 | 1 | ifthen | 93 |
| 82275 | 2 | merge | 93 |
| 82275 | 3 | readcsv | 94 |
| 40124 | 1 | melt | 83 |
| 40124 | 2 | readcsv | 63 |
| 40124 | 3 | forloop | 83 |
| 29113 | 1 | merge | 34 |
| 29113 | 2 | groupby | 56 |
| 29113 | 3 | ifthen | 85 |
| 48454 | 1 | readcsv | 87 |
| 48454 | 2 | groupby | 87 |
| 48454 | 3 | forloop | 62 |
The data set we started with was in a wide format, where the question scores and titles were all in separate columns. It's called "wide" because there are many columns, increasing the width of the table.
Wide format
| student_ID | ques1 | title1 | ques2 | title2 | ques3 | title3 |
|---|---|---|---|---|---|---|
| 11926 | 45 | readcsv | 78 | groupby | 86 | forloop |
| 82275 | 93 | ifthen | 93 | merge | 94 | readcsv |
| 40124 | 83 | melt | 63 | readcsv | 83 | forloop |
| 29113 | 34 | merge | 56 | groupby | 85 | ifthen |
| 48454 | 87 | readcsv | 87 | groupby | 62 | forloop |
Now that we have defined the wide vs. long formats, we need to introduce the pandas tools that we use for converting between them.
Pandas - melt()
When we start with data in a wide format, we use the pd.melt() function to move or unpivot
some columns of a DataFrame. The parameters of this function are:
- identifier variables (id_vars) - identifies the observation (row)
- measured variables (value_vars) - the columns that will unpivot
Let's use an example from the pandas pd.melt() documentation, and see how this works.
# Import libraries
import pandas as pd

# Create a DataFrame
df = pd.DataFrame({'A': {0: 'a', 1: 'b', 2: 'c'},
                   'B': {0: 1, 1: 3, 2: 5}
                  })
display(df)

# Melt or unpivot the B column
pd.melt(df, id_vars=['A'], value_vars=['B'])| A | B | |
|---|---|---|
| 0 | a | 1 |
| 1 | b | 3 |
| 2 | c | 5 |
| A | variable | value | |
|---|---|---|---|
| 0 | a | B | 1 |
| 1 | b | B | 3 |
| 2 | c | B | 5 |
In the above example, we set column 'A' as the identifier column (a, b, c) and column 'B' as the observation values (1, 3, 5)
So how do we go back? The above operation is called unpivoting so the reverse must be to pivot.
Pandas - pivot()
This function reshapes data based on column values. In the parameters, we specify the index or columns that will form the axes of the resulting DataFrame.
- index - column to use to create the new index
- columns - values in this column will create the new columns
- values - column(s) to use for populating the values
Let's use another example from the pandas documentation to pivot a DataFrame.
# Create the DataFrame
df = pd.DataFrame({'foo': ['one', 'one', 'one', 'two', 'two', 'two'],
                   'bar': ['A', 'B', 'C', 'A', 'B', 'C'],
                   'baz': [1, 2, 3, 4, 5, 6]})

# Look at the DataFrame
display(df)

# Pivot with the given
df.pivot(index='foo', columns='bar', values='baz')| foo | bar | baz | |
|---|---|---|---|
| 0 | one | A | 1 |
| 1 | one | B | 2 |
| 2 | one | C | 3 |
| 3 | two | A | 4 |
| 4 | two | B | 5 |
| 5 | two | C | 6 |
| bar | A | B | C | |
|---|---|---|---|---|
| 0 | foo: one | 1 | 2 | 3 |
| 1 | foo: two | 4 | 5 | 6 |
Follow Along
It is often helpful to use real data sets when looking at different parameters. The seaborn plotting library comes with several data sets, which are easy to load once you have imported the library. The flight's data set records the year, month, and the number of passengers who flew.
# Import the seaborn plotting library
import seaborn as sns

# Load the
flights = sns.load_dataset("flights")
flights.head(10)| year | month | passengers | |
|---|---|---|---|
| 0 | 1949 | January | 112 |
| 1 | 1949 | February | 118 |
| 2 | 1949 | March | 132 |
| 3 | 1949 | April | 129 |
| 4 | 1949 | May | 121 |
| 5 | 1949 | June | 135 |
| 6 | 1949 | July | 148 |
| 7 | 1949 | August | 148 |
| 8 | 1949 | September | 136 |
| 9 | 1949 | October | 119 |
We can see that this data is already in an extended format; it is also tidy, with one variable per column and observations organized by row. As discussed earlier, long/tidy format makes it easier to analyze, group data, and perform different operations on those groups. But, long format isn't always the best for creating visualizations.
Using the .pivot() method, we'll transform it into a form that is easier to plot.
# Pivot - indexed by year, one month per column, value is passengers/month
flights_pivot = flights.pivot(index='year', columns='month', values='passengers')

# Display the pivoted DataFrame
display(flights_pivot)| year | January | February | March | April | May | June | July | August | September | October | November | December |
|---|---|---|---|---|---|---|---|---|---|---|---|---|
| 1949 | 112 | 118 | 132 | 129 | 121 | 135 | 148 | 148 | 136 | 119 | 104 | 118 |
| 1950 | 115 | 126 | 141 | 135 | 125 | 149 | 170 | 170 | 158 | 133 | 114 | 140 |
| 1951 | 145 | 150 | 178 | 163 | 172 | 178 | 199 | 199 | 184 | 162 | 146 | 166 |
| 1952 | 171 | 180 | 193 | 181 | 183 | 218 | 230 | 242 | 209 | 191 | 172 | 194 |
| 1953 | 196 | 196 | 236 | 235 | 229 | 243 | 264 | 272 | 237 | 211 | 180 | 201 |
| 1954 | 204 | 188 | 235 | 227 | 234 | 264 | 302 | 293 | 259 | 229 | 203 | 229 |
| 1955 | 242 | 233 | 267 | 269 | 270 | 315 | 364 | 347 | 312 | 274 | 237 | 278 |
| 1956 | 284 | 277 | 317 | 313 | 318 | 374 | 413 | 405 | 355 | 306 | 271 | 306 |
| 1957 | 315 | 301 | 356 | 348 | 355 | 422 | 465 | 467 | 404 | 347 | 305 | 336 |
| 1958 | 340 | 318 | 362 | 348 | 363 | 435 | 491 | 505 | 404 | 359 | 310 | 337 |
| 1959 | 360 | 342 | 406 | 396 | 420 | 472 | 548 | 559 | 463 | 407 | 362 | 405 |
| 1960 | 417 | 391 | 419 | 461 | 472 | 535 | 622 | 606 | 508 | 461 | 390 | 432 |
Now we have the data in a format that could provide more flexibility for visualizations. Since we're talking about it, let's try out a seaborn heatmap:
# Create a heatmap of the pivoted flights data set
ax = sns.heatmap(flights_pivot) #uncomment to plot heatmap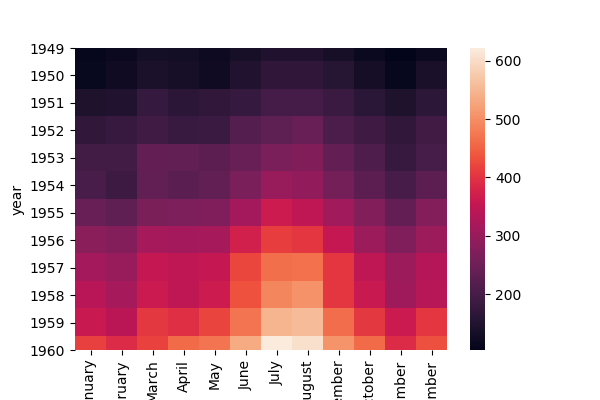
Challenge
The seaborn library has many additional datasets that you can use to practice. Choose one from this list and load it in the same way we loaded the flights data set; change the name to match the file. Once you have your data loaded, try out the following steps:
- use
.pivot()to create a wide-form table - try using more than one column for the values parameter
- use
.melt()to unpivot what you created - try out a heatmap if your data set is in the right format
Additional Resources
Guided Project
Open DS_113_Join_and_Reshape_Data.ipynb in the GitHub repository below to follow along with the guided project:
Guided Project Video
Module Assignment
Complete the Module 3 assignment to practice joining and reshaping data techniques you've learned. The assignment covers data concatenation, merging, and reshaping techniques.