Module 2: Spring Boot
Learning Objectives
- Build a REST service using Spring Boot
- Use Spring Boot annotations to set up your entry points into your application
- Start a Spring Boot application locally
- Use Postman to manually test local APIs
- Use Postman to manually test Web APIs
Introduction to Spring Boot
Spring Boot is an extension of the Spring framework that simplifies the building and development of applications. It takes an opinionated approach to configuration, automatically configuring your application based on the dependencies you've added to your project. This allows you to get started with minimal setup and configuration.
Spring Boot applications can be created and run without requiring a web server, as it comes with an embedded server (typically Tomcat). This feature simplifies deployment and is ideal for microservices development.
Key Benefits
- Minimal configuration with sensible defaults
- Embedded server support
- Production-ready features (metrics, health checks)
- Automatic dependency management
- No XML configuration needed
Spring Framework Overview
One of the best descriptions of Spring is from https://en.wikipedia.org/wiki/Spring_Framework!
Defined
The Spring Framework provides libraries that allow for building web applications on top of Java. Spring is an application framework concentrating on Inversion-> of-> Controller->. Inversion of Controller is when your application receives the flow of control - how the application manages state, figures out what to run when - from a generic framework, like Spring! Spring handles the standard web flow of the application so we can concentrate on what makes our application unique
Projects
Spring does much, much more than just web development. Spring provides several different modules and operations, such as:
- Microservices
- Reactive
- Cloud
- Web apps
- Serverless
- Batch
You can find out more about each one of these at https://spring.io/why-spring
For a simple example, look at the following code for what a class looks like with Spring annotations. Notice that with a few annotations (@RestController and @GetMapping), Spring will route requests to the /cats path to the findAllCats method.
package com.lambdaschool.catsanddogs.controllers;

import com.lambdaschool.catsanddogs.repositories.CatRepository;
import org.springframework.beans.factory.annotation.Autowired;
import org.springframework.http.HttpStatus;
import org.springframework.http.ResponseEntity;
import org.springframework.web.bind.annotation.GetMapping;
import org.springframework.web.bind.annotation.RestController;

@RestController //Spring Annotation to bring in web plumbing for Rest Endpoints
public class CatController
{
    private CatRepository catRepos = new CatRepository();

    @GetMapping(value = "/cats", produces = {"application/json"}) //Spring Annotation to set up web plumbing for HTTP Method Get
    public ResponseEntity findAllCats()
    {
        return new ResponseEntity<>(catRepos.findAll(), HttpStatus.OK);
    }
}
Spring Boot
Spring Boot is a special project of Spring. You can read more about it at https://spring.io/projects/spring-boot.
The purpose of Spring Boot is to make it easier to create stand-alone, production-grade Spring Applications. Spring Boot provides automatic configurations of the Spring Framework, helping us create applications that "just work". We can concentrate on what makes our applications unique, while Spring Boot provides standard configurations for how the web works in general.
Spring does this magic through Convention over Configuration. Most web applications work the same way just handling different data. So the idea behind convention over configuration is that inside of nit-picking each configuration detail, we can set up conventions or model sets of configurations that work just fine in most cases. We allow Spring Boot to make many of our configuration decisions for us, not only simplifying our work but unifying all Spring Boot applications. We are then just concerned with customizing what makes our application unique.
REST Architecture
Representational State Transfer (REST) is an architectural style for building web services. RESTful APIs typically use HTTP methods to perform CRUD operations on resources:
- CREATE - POST: Creates new resources
- READ - GET: Retrieves resources
- UPDATE - PUT/PATCH: Updates existing resources
- DELETE - DELETE: Removes resources
Key Topics
Spring Boot Basics
Learn the core concepts and components of Spring Boot.
Key Topics
- Auto-configuration
- Starters and dependencies
- Spring Boot application structure
RESTful Web Services
Create and manage RESTful APIs with Spring Boot.
Key Topics
- Creating controllers
- Mapping HTTP requests
- Request parameters and path variables
Dependency Injection
Understand Spring's IoC container and dependency injection.
Key Topics
- Spring beans
- Component scanning
- Using annotations like @Autowired
Spring Boot Configuration
Learn how to configure and customize Spring Boot applications.
Key Topics
- Property files
- Profiles
- Externalized configuration
Building REST Services with Spring Boot
You studied REST APIs in previous units. Here we will concentrate on how to use the Spring Framework in regards to developing REST APIs. If you wish to read a brief review of REST API concepts, keep going. Otherwise, skip to the header "So how do we build this".
What are Web APIs
REST API is one of many Web APIs. API stands for Application Programming Interface. APIs are used to expose data and business logic safely and conveniently and are accessible through endpoints or routes (e.g. https://www.boredapi.com/api/activity). Note that endpoints and routes are closely related and are often used interchangeably in practice.
We use REST APIs in this course, but two other popular Web APIs are GraphQL and SOAP. Feel free to explore those on your own.
What is Rest API
REST stands for Representational State Transfer and has two separate applications, a Client and a Server. We will be developing backend systems (servers) using a generic frontend system (client) to access the backends. Our servers will also be "stateless" which means our servers know nothing about the incoming request prior to receiving it. The server can contain a database, but each request a client makes is unique to the server.
HTTP Messages
To initiate a transaction a client sends a Request which can be made up of a route, a method, headers, and data or body. To respond to a Request from a client, a server sends a Response that is made up of headers, data, and an HTTP status code. If you try to go to https://www.boredapi.com/api/activity, much of these aspects are hidden from you but they're all being used to retrieve your data (you can inspect the page to find them and more details about the page loading). Essentially, when you hit the endpoint in your browser, you are making a GET request to the route. In response, the server of that route sends you data (as JSON) with an HTTP status code of 200.
CRUD and HTTP Methods
CRUD is an acronym for the four basic functions that are performed on persistent data. Persistent Data is data that outlives the process that creates it and/or data that is saved.
The Four Basic Functions that makeup CRUD then are
- C reate new data
- R ead existing data
- U pdate existing data
- D elete data
In REST we implement these CRUD functions through HTTP Methods. HTTP Methods guide us on what we want to do with our Request (do we want to get data, delete data, post data?).
The ones used for CRUD operations are:
| CRUD | HTTP Methods | Description |
|---|---|---|
| CREATE | POST | Throwback to the old bulletin board days when we posted a new message to the board |
| READ | GET | Just get me the data |
| UPDATE | PUT | Put my updated message on the bulletin board. This completely replaces the resource with new information coming in from the request. This requires the entire resource to be sent with the request - information being updated and information that is being left the same |
| UPDATE | PATCH | Just update the resource with the given information. Only the new, updated information is sent, and not the entire resource. |
| DELETE | DELETE | Look the names match finally - deletes the resource! |
So how do we build this
Dependencies
When we build a Java Spring CRUD Application, we must add certain dependencies to it. These external libraries will be added using the build.gradle file. Spring has many possible dependencies, but the dependencies that we'll focus on are:
implementation 'org.springframework.boot:spring-boot-starter-web'
developmentOnly 'org.springframework.boot:spring-boot-devtools'
testImplementation 'org.springframework.boot:spring-boot-starter-test'
Setting Up the Application
Within the application's main method, we can "start" a SpringApplication. This will allow our application to receive requests which Spring will then route to our class (i.e. Inversion of Control). To do this, we can add the annotation @SprintBootApplication before the main class's class declaration. Then we add one line inside the main method: SpringApplication.run(App.class, args);
Replace App.class with the name of the file that your main method is in (e.g. if your class is called "Main", then replace App.class with Main.class).
Your class should look like this:
package com.example.demo;

import org.springframework.boot.SpringApplication;
import org.springframework.boot.autoconfigure.SpringBootApplication;

@SpringBootApplication
public class DemoApplication {

    public static void main(String[] args) {
        SpringApplication.run(DemoApplication.class, args);
    }

}
With this done, we can run our app, open a browser (or a REST API helper like Postman), and send a request to the endpoint localhost:8080. This should produce a simple default Spring error page since we haven't added any routes yet.
Endpoints
Look at the code below for an example of a Controller. Controllers are a common name given to classes that manage where endpoints should start. Let's go through the annotations.
@RestController is used by Spring to route data to the proper endpoint. Spring will look up any class with @RestController to see if it has the requested route inside of it.
@GetMapping is used by Spring to find the correct method to execute using the annotation, among other annotations.
Do notice the name of the path variable findname follows throughout the code. The Java parameter is attached to the path variable using the @PathVariable annotation and by using the same name. Having the path variable the same name as the Java parameter is not a coincidence, it is required!
If we have more than one path variable, we know which path variable goes with which Java parameter because they have the same name. Also, note that we cannot have a default value for our Path Variable. Since the path variable itself is part of the route, we must provide it.
@RestController
public class DogController {
    private DogRepository dogRepos;

    @GetMapping(value = "/dogs/name/{findname}", produces = {"application/json"})
    public ResponseEntity findADogs(@PathVariable String findname) {
        return new ResponseEntity<>(dogRepos.findByName(findname), HttpStatus.OK);
    }
}
Parameters
Parameters are add-ons to the endpoint. We add them to the url using a ? followed by the parameter name, then an equal sign =, then the value of the parameter.
/dogs/name?name=dottie
/dogs/name?name=ginger
/dogs/name?name=mojo
/dogs/name - no parameter value given
In the code, we have handled this using the @RequestParam. Note that the parameter is not required, if we add the option required = false,. It does not need the same name as the Java parameter. We seldom use these as REST prefers the Path Variables.
@RestController
public class DogController {
    @Autowired
    private DogRepository dogRepos;

    @GetMapping(value = "/dogs/name", produces = {"application/json"})
    public ResponseEntity findADogs(@RequestParam(name = "findname", required = false) String theName) {
        return new ResponseEntity<>(dogRepos.findByName(findname), HttpStatus.OK);
    }
}
You can now try to build a Spring Boot application on your own. Remember that to run this application, you can start it like any other Java application by running your app's main method. Then you can enter the host localhost:8080 into a browser or a REST API client like Postman to access your endpoints.
Setting Up a Spring Boot Application
To create a Spring Boot application, you need to add the necessary dependencies to your build.gradle file:
implementation 'org.springframework.boot:spring-boot-starter-web'
developmentOnly 'org.springframework.boot:spring-boot-devtools'
testImplementation 'org.springframework.boot:spring-boot-starter-test'
Then, create your main application class with the @SpringBootApplication annotation:
package com.example.demo;

import org.springframework.boot.SpringApplication;
import org.springframework.boot.autoconfigure.SpringBootApplication;

@SpringBootApplication
public class DemoApplication {

    public static void main(String[] args) {
        SpringApplication.run(DemoApplication.class, args);
    }
}
Creating a REST Controller
Controllers in Spring Boot handle HTTP requests. Here's an example of a simple REST controller:
@RestController
public class DogController {

    @Autowired
    private DogRepository dogRepos;

    @GetMapping(value = "/dogs/name/{findname}", produces = {"application/json"})
    public ResponseEntity<?> findADogs(@PathVariable String findname) {
        return new ResponseEntity<>(dogRepos.findByName(findname), HttpStatus.OK);
    }
}
Understanding Spring Boot Annotations
@RestController: Identifies this class as a controller where every method returns a domain object instead of a view.@GetMapping: Maps HTTP GET requests to specific handler methods.@PathVariable: Extracts values from the URI path.@RequestParam: Extracts query parameters from the request URL.@Autowired: Automatically injects dependencies.
Different Types of Request Parameters
Spring Boot supports different ways to handle request parameters:
Path Variables
Used in URL paths like /dogs/name/dottie, where "dottie" is the path variable.
@GetMapping(value = "/dogs/name/{findname}")
public ResponseEntity<?> findADogs(@PathVariable String findname) {
    // Method implementation
}
Request Parameters
Added to the URL with a question mark like /dogs/name?name=dottie.
@GetMapping(value = "/dogs/name")
public ResponseEntity<?> findADogs(@RequestParam(name = "findname", required = false) String theName) {
    // Method implementation
}
Key Benefits of Spring Boot
- Rapid Development: Reduces boilerplate code and simplifies configuration
- Embedded Servers: Includes embedded servers (Tomcat, Jetty) for easy deployment
- Production-Ready: Provides health checks, metrics, and monitoring out of the box
- No XML Configuration: Uses Java annotations and properties files instead of XML
- Microservices Support: Designed with cloud-native applications in mind
Use Postman to manually test Web APIs
Overview
Fork and clone down this Github Repository and follow along.
Software Needed
- JetBrains IntelliJ IDEA IDE
- Postman
Postman is a very popular tool used to manually test APIs. It comes loaded with a lot of useful features that make testing APIs very easy and painless.
Testing APIs is different from testing websites or web applications. To test the latter, a web browser is sufficient, but for APIs, we need to be able to make POST/PUT/PATCH/DELETE requests and even modify the request headers.
For testing, we will use a tool called Postman. Postman, and other tools, which allow full control when making API requests. We can easily change the HTTP Method used, add JSON data to the body, add form data, add headers, examine the response, and more.
Installation of Postman is discussed in the objective about installing software for this Sprint. Here we discuss Using Postman.
Follow Along
Let's look at some basic uses of Postman. Throughout the course, when we need more functionality with Postman, we will introduce it at that time.
Postman is a frontend client. That means we need a backend system that we can access. For reading data, we will use the bd-spring-cats-and-dogs Github Repository. If you have not already, clone this repository. Now let's open it in IntelliJ. Feel free to look at the project and how the controllers, routes, and data access is set up.
Now go into the Application file and run the main class. Nothing fancy will happen! You will see log information in the console of IntelliJ. Your application will keep running until you stop it. That is the nature of these API applications. They are always running.

IntelliJ log
For now, leave your application running. When we are ready to stop the application, you click simple hit the stop button.
With the application running, we are now ready for Postman. Click on the Postman Icon on your computer Postman Icon
After exiting any Welcome Screens or Tips Popups, you are presented with a blank Postman window. You may need to add a blank tab. You do this by clicking on the + sign in the tabs
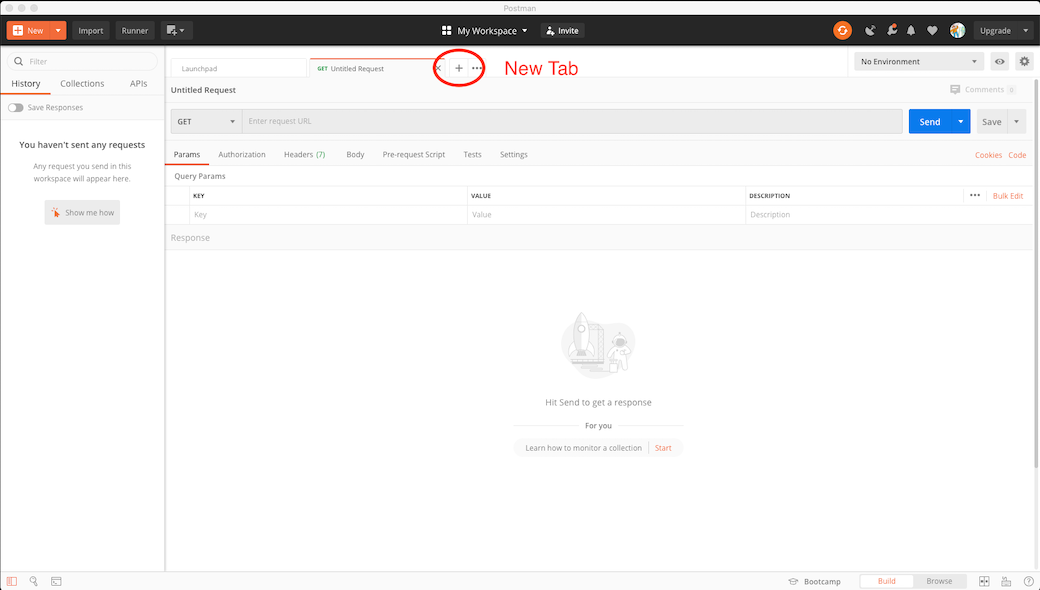
Postman Opening Screen
We are going to do a HTTP Method GET using the url http://localhost:8080/cats.
You have a pull-down menu in Postman where you can select the HTTP Method you want to use. We will be picking GET.
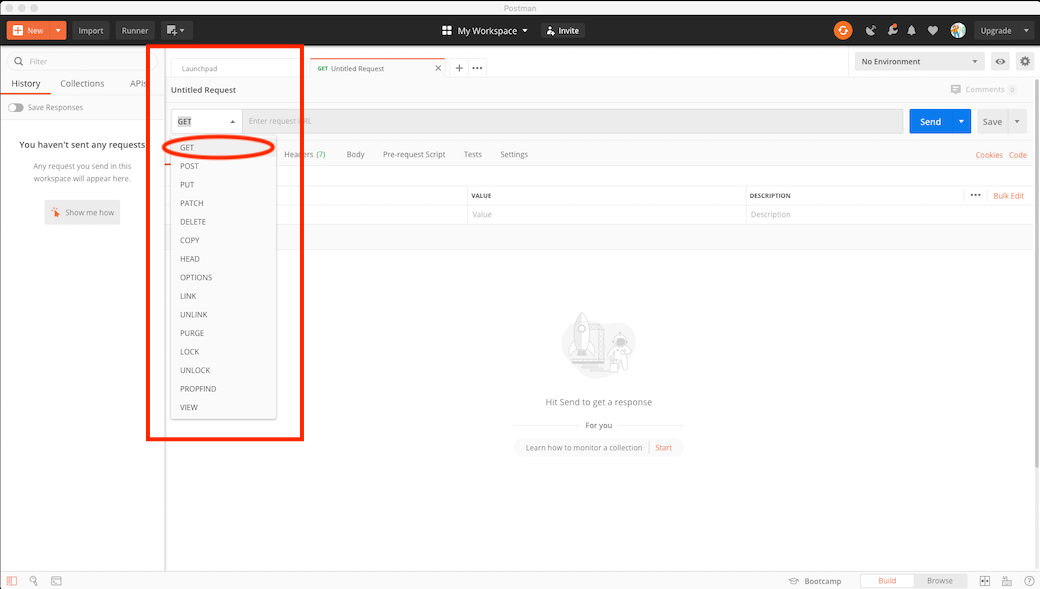
Postman HTTP Method
You have an address bar in Postman where you type the url you want to use. We will be using http://localhost:8080/cats

Postman address bar
Now click on Postman send icon
You will see "output" in the window at the bottom of Postman. Normally this output will be JSON objects. That is what you see in our example. Make sure the Body table is selected
[
    {
        "catid": 4,
        "catname": "Tiger"
    }
]
Postman Output
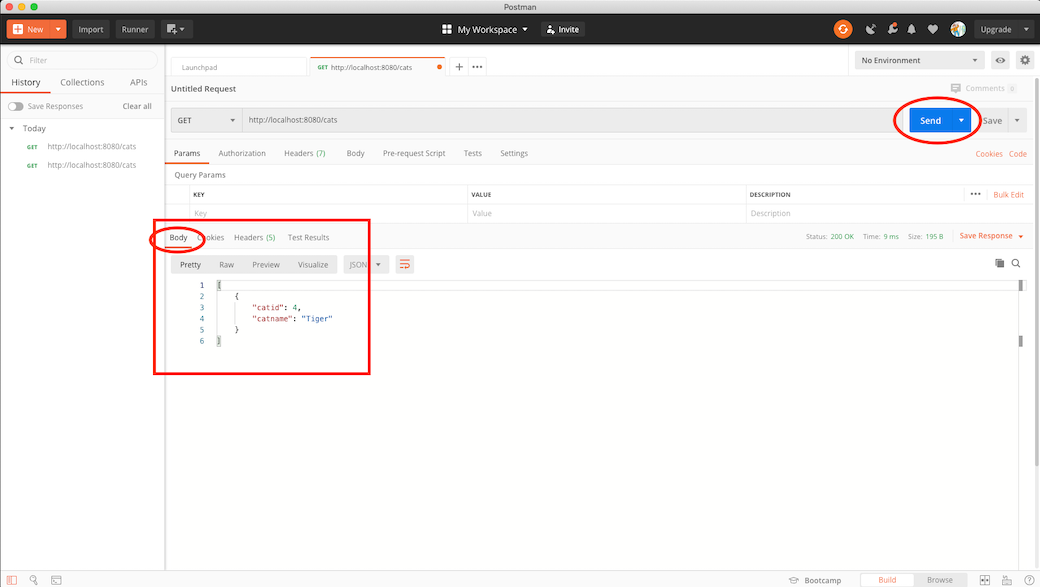
That is all! You can now use Postman to read data from an API.
Challenge
Let's try one on your own. Using a GET, read data from the URL http://localhost:8080/dogs. You should get the following data in your output window:
[
    {
        "dogid": 1,
        "dogname": "Dottie"
    },
    {
        "dogid": 2,
        "dogname": "Ginger"
    },
    {
        "dogid": 3,
        "dogname": "Mojo"
    }
]
Good job! You may stop your CatAndDog API for now!
Guided Project
Please fork and clone this Git Hub repo in preparation for today's Guided Project session. It is empty. Your instructor will walk you through filling it in during the Guided Project session.
Your instructor will walk you through the process of how to create a new Java project using Spring Intializr at the start of the Guided Project session today.
Be sure you add the "Spring Web" dependency to your project:
- Click the "Add Dependencies" button in the upper right corner of the page.
- Choose the "Spring Web" option