Module 3: JavaScript Functions
Declaring a Function
Introduction
Functions are one of Javascript's most fundamental building blocks on par with variables. To many, they are a crowd favorite because functions perform actions: they help create new values and structures and update old ones.
Functions operate a lot like scientific experiments. Take, for instance, the classic elementary experiment in which "lava" erupts from a volcano model. In this example, you first need materials, such as baking soda and vinegar (and maybe some orange food coloring). Then you run a series of actions, like combining the baking soda and vinegar. The result? A chemical reaction that causes the volcano to erupt!
Functions operate similarly: they usually start with an input, perform some step-by-step action involving that input, and return a new output. In other words, functions are a means for software developers to take old values or structures and create new valuable ones.
In this reading, you will learn how to write a function in its most basic format and run, or "invoke", a function. You will also start learning about scope, which tells us which variables may and may not be accessible to the functions we write.
Why Use Functions?
In the end, functions execute a block of code to manipulate data and perform an action. So why must you "encapsulate" this code inside a function? Well, you don't, but by using functions, you will gain a lot of advantages:
- Functions are declared only once in your code and can be invoked multiple times when needed. This is re-usable code in practice and prevents you from rewriting repetitive code;
- Your code will be easier to write, read, and maintain. As a developer, you will be able to concentrate your efforts on a particular action (function) without worrying about other parts of the application;
- By designing what a function should receive (data to be manipulated) and what it is supposed to accomplish, you can defer the actual implementation of the function for a later phase in development and continue with your main code.
- As long as you know what kind of data you are supposed to pass for a function and what data will be returned by the function, you can "import" and use existing functions designed by other developers without caring about their actual implementation.
Pre-requisites
Values and Variables, Conditional Code
Case Study: Discovering Oceana
Continuing with our analogy involving scientific experimentation, you are an emerging software developer for a marine biological research lab called "Discovering Oceana." Established in 2017, this research lab focuses on advancing techniques to best protect marine species that live near large human populations. Your task is to write a few functions that will help manage the data of their ongoing research on how well species survive in these regions.
Writing a function statement
Overview
The most straightforward format for writing a function is as follows:
function sayHello() {
    console.log("Hello")
}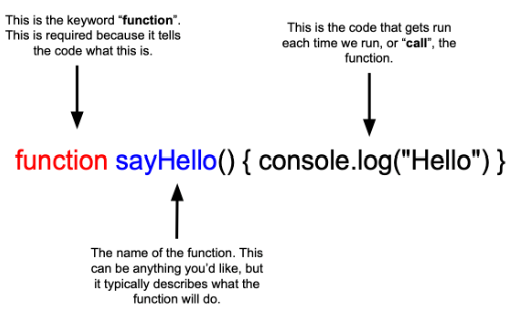
In this format, we start with the keyword function which indicates a new function is about to be constructed. JavaScript (and other languages) use keywords like this to define something, similar to how let or const define variables.
Then we add a function name sayHello followed by a set of parentheses. These parentheses will have significance later on, but leave their contents empty for now. The last item on line 1 is an open curly bracket { delineating what actions the function will take when running.
The following lines are indefinite, depending on how many steps you want to happen in this function.
The final line will include a closed curly bracket } which will signify the end of the function being written, with no semicolon.
In order to run the function, better known as "invoking" or "calling", we would do the following:
sayHello() // this will invoke the function above and cause the console to print "Hello"Please note: unless you invoke the function, it will not run, but this is good news. By requiring a separate line of code to invoke a function, we can quickly write multiple functions upfront that we can then invoke when we want and how often we want to use them down the road.
A Function Always "Returns"
Whenever a function completes, the application resumes execution from the point where the function was invoked. For instance, using the example above, if you run this code:
console.log("This is logged before the function is invoked")
sayHello() // this will invoke the function above and cause the console to print "Hello"
console.log("This is logged right after the function is finished")
By default, a function will return when it reaches the closing curly bracket. You can also force a return by explicitly adding the return statement inside the function's code. Perhaps you want to return sooner if a certain condition is met. You will learn more about the return statement later in this module. For now, remember that a function returns automatically when it reaches the end of its enclosed code.
How to Build it
Let's see how this basic syntax plays out in your work with the "Discovering Oceana" marine research lab. The team leaders are currently trying to debug their existing application that has been acting up lately. More specifically, they are trying to track down where various errors originate. The errors occur across multiple processes, and they can't tell when one process starts and another ends. They would like you to write a function that prints out the words "process started" to the console that they can call at the beginning of each process, so when an error presents itself, they will know between which processes it exists. You can write this function like this:
function startProcess() {
  console.log("process started") // action to be performed by the function
}
Now to invoke the function at the beginning of each process, we can simply write:
startProcess()This will run the function and cause the console to print "process started" whenever the function is invoked.
Walkthrough
Invoking a function
Overview
So far, we have learned how to write basic functions; however, if you wanted to run the function, it would require one more step. To run a function it needs to be called, better known as "invoking," by stating the name of the function followed by a pair of parentheses, as in myFunction(). Invoking a function is always done outside the function itself and looks like this:
function functionName() {
    console.log("Can you invoke this function?")
}

functionName() // this will invoke the function above and cause the console to print "Can you invoke this function?"
There are hidden advantages to requiring a separate line of code to run a function. By requiring a function to be invoked in order to run, we can easily do the following:
- We can write multiple functions upfront that we can then invoke later in our program
- We can write one function and invoke that same function multiple times throughout our program.
How to Build it
Let us return to the function we just wrote for our "Discovering Oceana" application. Our function, startProcess() is designed to print the following message to the console: "Process started". We can now invoke this message as many times as we need to throughout our program. Let us simulate this by adding a few lines of comments to represent distinct processes in our program.
function startProcess() {
    console.log("Process started") // rewriting the function from before
}

startProcess()
// First process block of code

startProcess()
// Second process block of code

startProcess()
// Third process block of code
Whenever we invoke the startProcess() function above, our "Process started" message gets printed to the console. Remember, we initially wrote this function to better track down where any errors might originate. If only two "Process started" messages are printed to the console when we run the program, we could assume that an error occurred during the third process.
Walkthrough
Writing a function expression
Overview
Alternatively, and this is commonly used, you will see basic functions being written as "variable expressions", as seen here:
const sampleFunction = function() { // function name used as variable name instead
    console.log("Hello")
}

sampleFunction() // prints "Hello"
The only major syntactical differences are that the desired function name is now the variable name (declared with a keyword let or const followed by an equal sign =), and a keyword function() is added where the old function name used to be. So far, you have only seen primitive values stored in variables, like strings or numbers. Storing a function in a variable may not seem helpful, but later you'll learn how to leverage this when it comes to function inputs. Finally, when invoking this function, we can call it as we did before.
How to Build it
Let's return your work to the "Discovering Oceana" marine research lab. The team would like you to save the function you created earlier to a variable. This will better allow them to use this function inside other functions, a concept we will cover later in the course.
const startProcess = function() { // proper format for function expression
    console.log("process started") // action to be performed by the function
}

startProcess() // prints "process started"
Same as before, the function is saved as a variable that receives its name startProcess. Don't forget that to actually execute the function, or print out "process started," you need to invoke the function.
Walkthrough
Changing the outer world using a function
Overview
Accessing Outside Variables from Within a Function
Functions often need access to variables that have been declared outside the function. Which variables it can access depends on where the variable is declared. Determining what variables are accessible, or "visible", to other functions, refers to a concept called "scope". We will elaborate on this concept more thoroughly in a future lesson, but it's essential to understand how it relates to functions. For now, here is an example of when a variable declared outside a function is still within its scope, and, thus, accessible:
const sampleVariable = "This variable can be used by a function" // declaring a variable

function sampleFunction() { // adding a function to print the sampleVariable's value
   console.log(sampleVariable)
}

sampleFunction() // executing the function; prints "This variable can be used by a function"
As you can see from the example above, our function sampleFunction() was, in fact, able to access the value of sampleVariablebecause sampleVariable was defined before the function was invoked. Had we defined sampleVariable after sampleFunction was invoked, it would have thrown a Reference Error, meaning, Javascript ran the function before it knew sampleVariable existed.
Not Accessing Variables Created within a Function from the Outside
Unfortunately, a function's ability to access a variable's value declared outside the function doesn't mean that a variable declared inside a function can be accessed from the outside. Think of this concept as similar to a car's dark-tinted windows. Functions are much like the car itself, a container of activity. People inside the car can clearly see themselves inside the car and what others are doing outside the car, and they can use any information they see from both. On the other hand, people outside the car can't see inside the car, and, thus, can not access any information that happens inside.
In other words, when variables are declared inside a function, only that function can access that variable and its value.
Consider the following example:
function sampleFunction() {
  const sampleVariable = "Can you access this value?"; // declaring a variable inside the function
  console.log(sampleVariable)
}

sampleFunction() //prints "Can you access this value?"

console.log(sampleVariable) // throws a reference error, can't find "sampleVariable"
In this example we can clearly see that although the value of sampleVariable was accessible within the sampleFunction, it was not accessible outside the function.
Same Rules for Conditional Statements
This concept also applies to conditional statements, not just functions. Here is an example of us trying to print a string's value that was declared in a conditional statement from both inside and outside the conditional statement:
let sampleNumber = 85 // declaring sample variable

if (sampleNumber > 50) { // establishing a conditional statement
  let message = "This is a high number!" // declaring a new variable in the conditional statement
  console.log(message) // prints "This is a high number!"
}

console.log(message) // throws a Reference Error because "message" is not defined
How to Build it
Print Process Time in Seconds
Let's return to your work on the "Discovering Oceana" application. Thanks to your earlier work, the team has also been able to track how long each process takes. They have noticed that some processes take longer than two seconds, which is too slow. To detect slow processes, the team would like you to print a message if any process is too slow. First, they would like you to convert the time from milliseconds to seconds so they can easily see which ones take longer than two seconds.
Here is how this would look:
const processSpeed= 12235 // declaring variable outside function

const printProcessTimeInSeconds = function() { // syntax for function expression
  const processSpeedInSeconds = processSpeed / 1000
  console.log("Time to complete process: " + processSpeedInSeconds)
}

printProcessTimeInSeconds() // prints "Time to complete process: 12.235"
Adding a Conditional Message
Finally, the team would like to add a conditional statement to your function that will print the message "Slow Process Detected!" whenever the process duration from your work detects a process greater than two seconds.
Here is what that would look like:
const processSpeed= 12235 // declaring variable outside function

const printProcessTimeInSeconds = function() { // syntax for function expression
  const processSpeedInSeconds = processSpeed / 1000
  console.log("Time to complete process: " + processSpeedInSeconds)

  if (processSpeedInSeconds > 2) { // standard conditional format
    const message = "Slow Process Detected!"
    console.log("Slow Process Detected!")
  }
}

printProcessTimeInSeconds() // prints "Time to complete process: 12.235" and "Slow Process Detected!"
Since we've declared processSpeed before the functions and conditional statements, it is accessible inside and outside the conditional statement. In contrast, any variable declared inside the conditional statement, like message, can not be accessed outside the conditional statement.
Conclusion
In this core competency, we learned how to write a function both in its traditional form and as a variable expression, and how to run, or "invoke", that function. We also learned how we can both access and modify information that pre-exists outside the function. Moving forward, you will come to know just how frequent these learning objectives are utilized. If the concepts are not fully clear now, don't worry. You will get lots of practice with them each day here at BloomTech and feel more comfortable with them each day.
Walkthrough
Returning Values
Introduction
When developing an application, functions support an application's much larger flow or purpose. Functions help organize code and allow code to be reused in various parts of an application. But functions can provide so much more value. One of the essential configurations for a function is for it to return a value that the rest of the application can use.
The importance of functions returning a value, better known as a "return value," is much like the importance of repairing products that you would like to use again. Say you would like to see the latest comedy movie with your favorite comedian. You go up to a kiosk to buy your ticket, and you give the kiosk your money. The kiosk has a function that processes the payment and returns a ticket. But what if the kiosk just took your money and didn't return a ticket? At the very least, you would think you're dealing with a broken kiosk. The process of buying a ticket means you expect a specific output: the ticket itself. Thankfully, the kiosk shoots out the ticket, and you enjoy your movie, laughing the whole time.
In the same way, functions can produce helpful values for the application. In this reading, you will learn about how we can configure our functions to return a value, rather than only perform a list of actions.
Pre-requisites
Declaring a Function
Case Study: Discovering Oceana
We'll return to our case study from the last core competency where you work as a software engineer for the marine research lab "Discovering Oceana". Allowing your prior functions to print important values to the console worked well to help them track errors and slow processing times, but now it is time to upgrade your functions to return important values needed to better inform their research.
Returning a value from a function
Overview
Returning Values from a Function
In addition to performing internal actions, like printing things to the console, functions can return a value back to the rest of the program. Once returned, a program can use that value however it sees fit. Writing a function to return a value is very similar to how we have written functions before:
function sampleFunction() { // creating a function with the same, standard syntax
  return "sampleValue" // using the keyword "return" to return a value
}
The only key difference when returning a value in a function is to use the keyword return in front of the value you want to return. This is typically done on the last line within the function.
Furthermore, you can also access that value outside the function by saving the invoked function to a variable, as in:
function sampleFunction() { // same function as above
  return "sampleValue" // using the keyword "return" to return a value
}

const returnValue = sampleFunction() // assigning a variable to the called function
console.log(returnValue) // prints "sampleValue"
You can then use your console to confirm that the returned value, named sampleValue here, did in fact get extracted from the function and was saved to a variable, named returnValue here, outside that function.
Default Return Value
One more thing to note. If you try and access a return value from a function that does not have a return value, the default value returned will be undefined as in:
function sampleFunction() {
  console.log("sampleValue") // "return" keyword is omitted
}

const sampleValue = sampleFunction()
console.log(sampleValue) // returns "undefined"
Having said this, since the function did run successfully, sampleValue still printed to the console.
How to Build it
Since being established in 2017, the research done at "Discovering Oceana" has successfully found and documented a total of 155 marine species. Their software application has saved that value to a variable named totalSpeciesFound. They would like you to write a function that will run each time they find a new species. That function will do the following: print "Another species has been found!" to the console, add one to the current total species variable, and return the new number of species found.
Here is how that would look:
let totalSpeciesFound = 155 // declaring variable to hold the value of 155

function addOneSpecies() { // adding function to add one species
  console.log("Another species has been found")
  totalSpeciesFound++ // syntax for adding one
  return totalSpeciesFound // notice the keyword "return"
}
Let's now test the addOneSpecies() function by saving its return value to a variable and printing it to the console.
const newTotalSpeciesValue = addOneSpecies() // declaring new variable to save return value
console.log(newTotalSpeciesValue) // prints 156
Walkthrough
Returning a value VS. printing a value
Overview
Configuring a function to return a value is a way to get new values created inside the function for other parts of the program. Aside from return values, you can also perform actions within a function that will affect other parts of the program, like printing to the console or updating values of pre-existing variables (as long as it's in scope). These actions are better known as "side effects" because they directly impact parts of a program that exist outside the function itself.
Let's compare and contrast these two examples one after another:
Using Return Values
function sampleFunction() {
  return "Print Me" // using keyword "return"
}

const returnValue = sampleFunction()

console.log(returnValue) // prints "Print Me"
Pro Tip: Alternatively, you could also combine the last two lines of code like so:
function sampleFunction() {
  return "Print Me" // using keyword "return"
}

console.log(sampleFunction()) // prints "Print Me"
Using Side Effects With No Return Values
function sampleFunction() {
  console.log("Print Me") // prints "Print Me"
}

sampleFunction()
As you can see, all examples ultimately do the same thing. The only difference is that the first one returns the string, "Print Me" to print outside the function, and the last prints the string, with no return value. All are not only acceptable in Javascript, but are equally as useful depending on the circumstance. As you gain experience working with Javascript, it will become more obvious which one to use for which circumstance.
How to Build it
The "Discovering Oceana" marine research facility has realized that one of their documented species' populations, the "orange mackerels", is tragically collapsing. They would like you to write a function that would keep an accurate count of how many individuals remain in the population. When invoked, this function will subtract one individual from the total population of orange mackerels, which exists in an outside variable called orangeMackerelPopulation. The function will also need to return the new population number.
Here is how that would look:
let orangeMackerelPopulation = 34 // declaring variable to hold the population number

function subtractOneMackerel() { // standard function syntax
  orangeMackerelPopulation-- // shorthand for subtracting one from the population
  return orangeMackerelPopulation // returning new population number
}
Fast forward a few weeks, and the orange mackerel population has gotten worse. You have had to invoke the subtractOneMackerel()function five times since you first wrote it. Let's go ahead and invoke this function five times, but save the return value of the last one so that we can get a current count of the population.
subtractOneMackerel() // invoking function
subtractOneMackerel()
subtractOneMackerel()
subtractOneMackerel()
const currentMackerelPopulation = subtractOneMackerel() // saving return value to variable

console.log(currentMackerelPopulation) // prints 29
console.log(orangeMackerelPopulation) // also prints 29
This example confirms a few things that we have learned so far. For one, we can return a value from a function, and then access that value from outside the function, like when we printed the value of currentMackerelPopulation and got 29.
Secondly, even more revealing, we can confirm that each time we invoked the subtractOneMackerel() function, the original orangeMackerelPopulation variable declared outside the function was, in fact, changed. This change is due to the side effect we included in the function that subtracted one individual from the current orange mackerel population, orangeMackerelPopulation--. We can see this most clearly when we printed the value of orangeMackerelPopulation to the console after invoking the function five times and got a value of five less than the original.
Walkthrough
Conclusion
In this core competency, we learned how to return values within a function – a very important feature because it gives a value back to the rest of the program. We also learned that, in some cases, we can ascribe actions to a function that do not return a value, also known as "side effects." These are less common but still are called for depending on the circumstances. Right now, the differences between these two approaches might seem negligible. Still, I assure you that, as you are introduced to new circumstances in programming, these two approaches will seem very different, and the correct one for you to use will be obvious.
Passing Arguments
Introduction
So far, we have treated functions as both the modifiers and creators of information, declaring variables and setting values specifically for the function's purpose. In reality, this is not usually the case, but it can be. Under most circumstances, functions will need to take in some raw information, also known as "input," before carrying out their function to modify it.
In this way, functions can be much like artists who require some medium or raw material to carry out their artistic processes. A sculpture needs clay; a painter needs paint and a brush, etc. In the same way, many functions need raw information that they can, in turn, modify to make a useful output for the entire program.
In this reading, you will learn just how to use inputs, better known as "arguments", for functions, and how those arguments determine the unique outputs of that function.
Pre-requisites
Declaring a Function and Returning Values
Case Study: Discovering Oceana
Continuing with our case study on the "Discovering Oceana" marine research lab, your next task as the software engineer is to write some functions that allow them to use custom arguments to help them document species' locations.
Making functions accept information
Overview
Adding Input Values as Arguments to Functions
Functions are generally more helpful when they receive input values, better known as "arguments". Receiving inputs allows a function to produce more relevant outputs.
First, let's define a few concepts, as "arguments" and "parameters" are often used to refer to the same data, but are technically different:
- Function arguments are the real values passed to the function.
- Function parameters are the names listed in the function's definition.
- Parameters are initialized to the values of the arguments supplied.
Here is the standard format for a function that can receive one argument:
// the parameter variable name is placed in the parentheses of the function. This value of this variable is going to be the argument sent by the user when calling the function.
function sampleFunction(sampleParameter) {
  // parameter name is used as a variable in the body of the function
  console.log('The value received as an argument is: ' + sampleParameter)
}

// the value in the parentheses will be used as the argument for that function, and will be assigned to the parameter.
sampleFunction("The dog ate my homework")
This example demonstrates a few key points regarding arguments and parameters:
- The parameter name can then be used as a variable in the body of the function and only inside the function (local scope)
- Like a variable, a parameter can be named almost anything and gets placed between the parentheses of the function when declared
- When invoking the function, a value is placed within the parentheses, which is then passed into the function as the argument. The function can access this value by using the parameter's name
If we were to instead invoke the function with sampleFunction("Dogs are better than Cats"), the console would then print: "The value received as an argument is: Dogs are better than Cats"
Adding Variables as Arguments to Functions
Functions can also receive variables that hold values as arguments, rather than just the value itself, as in:
let favNum = 5; // declare variable to hold my favorite number

function myFavoriteNumber(num) { //write function that accepts one argument
  console.log(num + " is my favorite number")
}

myFavoriteNumber(favNum) // prints "5 is my favorite number"; notice how the variable favNum from above was used as the argument.
Adding Multiple Arguments to Functions
Furthermore, functions can be configured to receive more than one argument. To create a function with two arguments we would follow the same syntax but add a comma between the parameter names:
function addItUp(num1, num2) { // adding two argument names separated by a comma
   let sum = num1 + num2
   return sum
}

let result = addItUp(3, 4) // result will be set to 7
It's also worth noting that functions can receive arguments of different value types, such as one string and one number.
How to Build it
The marine research team at "Discovering Oceana" has a new project for you: to help them update the population count of various species from two habitable zones. For this, they would like for you to create a function that accepts three arguments:
- A species name.
- The new population at "zone 1".
- The new population at "zone 2"
In reality, the current population numbers for each species at each zone are on the research lab's database. To test your function, you are using two sample population numbers stored in variables named zone1Population and zone2Population that you can update instead. We also would like to print the updated values to the console.
Here is how that would look:
zone1Population = 34 // saving zone1 current population count
zone2Population = 15 // saving zone2 current population count

function onSpeciesPopulationChange(species, zone1Count, zone2Count) { // writing function to accept three arguments
  zone1Population = zone1Count // updates value of zone1Population
  zone2Population = zone2Count // updates value of zone2Population
  console.log(species + " population - Zone1: " + zone1Population + ", Zone2: " + zone2Population)
}

onSpeciesPopulationChange("Bottlenose Dolphin", 21, 27) // prints "Bottlenose Dolphin population - Zone1: 21, Zone2: 27"
As you might have already noticed, by allowing this function to accept different arguments, the function then becomes very versatile. Now it can handle new population counts for any species. Functions for the win!
Walkthrough
Conclusion
In this core competency, we learned one more key feature of functions: functions can receive inputs, or "arguments." Arguments are pre-existing information that a function can access and then modify to output something new. At this point, it is fair to say that all of the fundamentals of functions (a standard format, receiving inputs, performing actions, and returning values) have been covered. Everything to follow is merely alternatives and add-ons. And even though what is left to be covered is still essential to learn, I hope this information makes it easier to digest the big picture of how functions operate.
String Interpolation
Introduction
Like numbers, booleans, and a few others, strings are one of the most fundamental primitives used in Javascript. As a software developer, there will not be a day that goes by without working with strings. Strings constantly need to be created, evaluated, and edited for countless reasons in the context of any web application.
So far, we have learned how to write strings, store them in variables, and concatenate multiple strings and/or variables using the + sign, but this is just the tip of the iceberg. There are dozens if not more, actions that you can do with strings to better use them for different software application purposes.
This reading will focus on three of the most commonly used ways to work with strings: finding their length, referencing indices (or positions) of characters in the string, and efficiently linking strings and variables into one long string.
Pre-requisites
Values and Variables
Case Study: Discovering Oceana
Numbers mean everything to the marine research lab "Discovering Oceana", but what are numbers without strings that explain them? The focus of this case study will be working with strings to help the research team better organize the data they have collected so far about their marine species.
Working with strings
Overview
Determining the Length of a String Using .length
Determining the entire length of a string is a very simple process: add one keyword ".length" to the end of either a string or a variable that holds a string value. Here are examples of both:
"Hello".length // this expression evaluates to 5
"I am a sample sentence.".length // evaluates to 23
const sampleWord = "Javascript"
console.log(sampleWord.length) // prints "10"

const sampleString = "I am another sample sentence!"
console.log(sampleString.length) // prints "29"
By chaining the keyword .length to the end of the value or a variable that holds the value of a string, we can access the total amount of characters in that string. Also, if you double-check the results, you might notice that any spaces or punctuation marks do count as a character and, thus, will add one to the total length of the string.
Using Indices on Strings
Another common way to use strings is to determine individual letters of the string by using something called an index (or indices for plural). Represented as an integer, an index refers to the numbered spot a character might be in a given string. You can access the character value of any given index by adding the index number surrounded by square brackets [ ] to the end of the string or variable that holds the string value, as seen here:
"Hello"[1] // index integer enclosed in square brackets; if printed to the console, prints "e"
"I am a sample sentence."[22] // if printed to the console, prints "."
let sampleWord = "Javascript"
console.log(sampleWord[3]) // prints "a"

let sampleString = "I am another sample sentence."
console.log(sampleString[9]) // prints "h"
There is one additional point worth noting. You might have noticed that in all these cases, the character printed is one after what you might expect. This is because index values always start at "0" not "1". In other words, the position of the very first character of a string is at index "0", and the second character is at index "1", and so on. This also means as we see in the second example, that the last character of any string is always at the index position that is one less than the total length of the string.
Using .length as an Index
Knowing that the last character of a string is at an index position one less than the total length of the string, we can use the keyword .length to help return the last character of any string.
let sampleString = "I am, hopefully, the last sample sentence of this section."
sampleString[sampleString.length - 1] // if printed to the console, prints "."
So no matter how long the string is, using this method will always give you the last character of a string.
Finally, it is worth noting here that if you try and print the value of an index that does not exist, the value that will be printed is undefined:
let sampleWord = "Javascript"
console.log(sampleWord[12]) // prints undefined
How to Build it
Extracting the First Letters of Each Species
Let's return to our case study by exercising your expertise on strings to help the research team better organize their data. In all their data collection, the research team has put together long lists of behaviors of all their documented marine species, but they need some way to sort all these behaviors alphabetically by their species' names. They would like you to first write how they could access the first letter's value of each species name.
Here is how that would look:
let speciesName = "Spanish Shawl Nudibranch" // flashiest slug, btw

console.log(speciesName[0]) // prints "S"
Don't forget that the first character's index (or position) is actually [0] not [1].
They expect to have multiple species names beginning with the same letter, and some with the same first two letters, so they are also asking for you to extract both the 2nd and 3rd characters as well with a few other examples:
let speciesName = "Sea Hare"
speciesName[1] // if printed to the console, prints "e"

let anotherSpeciesName = "Orca";
anotherSpeciesName[2] // if printed to the console, prints "c"
Determining the Last Letter of the "Name" Category
Oh no! The research team noticed a discrepancy in the data, making it difficult to sort by "name." Some researchers had inputted "name" as a category and wrote just the common name, while others inputted "names" and wrote both the common name and scientific name. They would like you to determine the value of the last character of the "name(s)" category. This will enable them to find those with extra "s" so they can eliminate it.
let entryOneCategory = "name";
console.log(entryOneCategory[entryOneCategory.length - 1]) //checking last letter value; prints "e"

let entryTwoCategory = "names"
console.log(entryTwoCategory[entryTwoCategory.length - 1]) // prints "s"
Walkthrough
Working with template literals
Overview
Using Template Literals for Concatenating Strings and Variables
Template literals are another useful tool when working with strings. They are a more manageable way to link multiple strings and/or variables together into one long string. Before diving into an example, let us revisit how we have concatenated strings and variables before:
const firstWord = "words"
const secondWord = "sentence"

console.log("Try adding these " + firstWord + " to the " + secondWord + ".") // using "+" sign to concatenate all the strings and variables together.
As you can see, especially for longer sentences, this process could get very tedious. Using a template literal, we get a different look:
const firstWord = "words"
const secondWord = "sentence"

console.log(`Try adding these ${firstWord} to the ${secondWord}.`) // see notes below
So there are a few key differences when using template literals that we need to point out:
- Template literals do not use quotes around the string. Instead, they use backticks, as in `Your string`, an odd character located above the "tab" key, to the left of the "1" key. It is a very common, early mistake to use single quotes instead of backticks.
- You can directly insert a variable into the string by surrounding it with curly brackets { } preceded by a $ sign. In doing so, whatever value has been assigned to that variable will be used for the string.
- And finally, when we use template literals, we technically no longer are concatenating a string, instead, we call it "string interpolation"
Using Template Literals for Multi-line Strings
Another helpful property of template literals is that you can write multi-line strings as you would in any word processor.
let samplePoem = `Learning to code can be a wreck,
but easier when I have BloomTech.
They will help me find a job too,
which is good in a world of many yous.`

console.log(samplePoem) // will also print on multiple lines
If you tried to create a multi-line string (like the one above) using quotes, you would get a "Syntax Error". Using quotes only allows for you to write on one line. There is a way to print long one-liner strings onto multiple lines by adding a new line character, \n, before each line, but the process can be a bit more cluttered than simply using template literals:
let samplePoem = "Learning to code can be a wreck,\nbut easier when I have BloomTech.\nThey will help me find a job too,\nwhich is good in a world of many yous."

console.log(samplePoem)
/* prints:
Learning to code can be a wreck,
but easier when I have BloomTech.
They will help me find a job too,
which is good in a world of many yous.
*/
How to Build it
The research team at "Discovering Oceana" would like to get some of their data out to the public in a nice, easily digestible sentence for them to read. They currently have three variables that store the species' name, height, and weight values. They would like you to turn these three values into an easy-to-read sentence for visitors to read when they visit their information center.
Here is how that would look:
const speciesName = "Garibaldi"
const weight = "2 lbs"
const length = "15 in"

const speciesFact = `The ${speciesName} weighs approximately ${weight} and has a length of ${length}.`

console.log(speciesFact) //prints "The Garibaldi weighs approximately 2 lbs and has a length of 15 in."
Don't forget the two most important details about template literals: the entire string is surrounded by backticks instead of quotes, and each variable in the string is surrounded by curly brackets {} preceded by a dollar sign $.
Conclusion
In this core competency, we learned a little more about dealing with strings, such as finding the length of a string using .length and using indices to determine the value of each character. We also learned how to concatenate strings and variables using template literals. Though it may seem this material on strings is tedious, you will find that string manipulation is quite common. And don't worry if you're not 100% comfortable with strings. With practice, working with strings will be second nature soon enough.
Walkthrough
Function Parameters
Functions can accept inputs called parameters that allow them to work with different data each time they're called.
Writing a Function Statement
The basic structure of a function in JavaScript:
function sayHello() {
    console.log("Hello");
}
To invoke (call) this function, you simply write:
sayHello(); // This will cause the console to print "Hello"
Function execution flow:
console.log("This is logged before the function is invoked");
sayHello(); // This will invoke the function and cause the console to print "Hello"
console.log("This is logged right after the function is finished");
Remember: Unless you invoke a function, it will not run. This is good news because it means you can define multiple functions upfront and only call them when needed.
Return Values
Functions can send data back to where they were called using the return statement.
Using the Return Statement
The return statement allows a function to output a value that can be used elsewhere in your code:
function addNumbers(a, b) {
    return a + b; // Returns the sum of a and b
}

const sum = addNumbers(5, 3); // The returned value (8) is stored in the 'sum' variable
console.log(sum); // Outputs: 8
Tip: A function stops executing as soon as it encounters a return statement. This means any code after the return statement will not be executed.
Functions Without Return
If a function doesn't have a return statement, it automatically returns undefined:
function greet(name) {
    console.log("Hello, " + name + "!");
    // No return statement
}

const result = greet("Alice"); // Logs "Hello, Alice!" to the console
console.log(result); // Outputs: undefined
Function Scope
Scope determines where variables are accessible in your code. Function scope limits variables to the function where they're defined.
Understanding Variable Scope
Variables defined inside a function are only accessible within that function:
function calculateArea() {
    const width = 10;
    const height = 5;
    const area = width * height;
    console.log("The area is: " + area);
}

calculateArea(); // Outputs: "The area is: 50"
// console.log(width); // Error: width is not defined outside the function
Global vs. Local Variables
Local variables are declared inside a function and can only be used within that function:
function showLocalVariable() {
    const localVar = "I'm local";
    console.log(localVar); // Works fine
}

showLocalVariable();
// console.log(localVar); // Error: localVar is not defined
Global variables are declared outside of any function and can be accessed anywhere in your code:
const globalVar = "I'm global";

function showGlobalVariable() {
    console.log(globalVar); // Works fine - can access the global variable
}

showGlobalVariable(); // Outputs: "I'm global"
console.log(globalVar); // Also works: "I'm global"
When local and global variables have the same name, the local variable takes precedence inside the function:
const value = "Global value";

function showValue() {
    const value = "Local value";
    console.log(value); // Outputs: "Local value" (local variable)
}

showValue();
console.log(value); // Outputs: "Global value" (global variable)
Arrow Functions
Arrow functions provide a concise syntax for writing function expressions in JavaScript.
Traditional vs. Arrow Functions
Let's compare traditional and arrow function syntax:
// Traditional function expression
const multiply = function(a, b) {
    return a * b;
};

console.log(multiply(5, 3)); // Outputs: 15
// Arrow function
const multiply = (a, b) => {
    return a * b;
};

console.log(multiply(5, 3)); // Outputs: 15

// Even more concise with implicit return
const multiplyShort = (a, b) => a * b;

console.log(multiplyShort(5, 3)); // Also outputs: 15
Note: Arrow functions have some differences in how they handle this keyword compared to regular functions. For beginners, focus on the syntax benefits, and you'll learn more about the behavior differences later.
Module 3 Guided Project: Functions
In this Guided Project, you will learn all about functions. You'll learn how to build functions, pass arguments, return values, and variable visibility. The video will also cover advanced troubleshooting and introduce you to template literals, helping you understand how to leverage these concepts in your code. We'll take you through each topic step by step, starting with how to set up your workspace so you can follow along with the instructor.
Module 3 Project: Functions
Locked
Overview
This module project will test your ability to create and use functions, a fundamental building block in software engineering, as it allows for modular, reusable, and efficient code, ultimately leading to more organized and maintainable programs.
The module project contains advanced problems that will challenge and stretch your understanding of the module's content. The project has built-in tests for you to check your work, and the solution video is available in case you need help or want to see how we solved each challenge, but remember, there is always more than one way to solve a problem. Before reviewing the solution video, be sure to attempt the project and try solving the challenges yourself.
If you can successfully get through all the Module Projects in a sprint, you are ready for the Sprint Challenge and Sprint Assessment, which you must pass to move on to the next Sprint.
Project Instructions
The link below will provide you with a direct download of a Module Project zip file:
- download the file,
- unzip the project, and
- open the index.html file in both VSCode and the Chrome Browser.
- VSCode is where you will make code changes, and
- Chrome is where you will check if your code is passing all the tests.
- In Chrome, open the Console by typing Ctrl+Shift+j (Windows) or Command+Option+j (Mac).
- Return to VSCode and start working on your Challenges.
- When you want to check if your code is correct, save changes, go to Chrome, and refresh the page.
- Test results and possible crashes will show in the Console.
- If the code contains a graphical component, it will display in the browser window.
Solution
Additional Resources
Try It Yourself
Practice creating and using functions by completing these exercises:
- Write a function that takes a person's name as a parameter and returns a greeting message.
- Create a function that calculates the area of a rectangle using width and height parameters.
- Write a function that converts Celsius to Fahrenheit.
- Rewrite any of the above functions using arrow function syntax.
Remember to test your functions by calling them with different arguments!